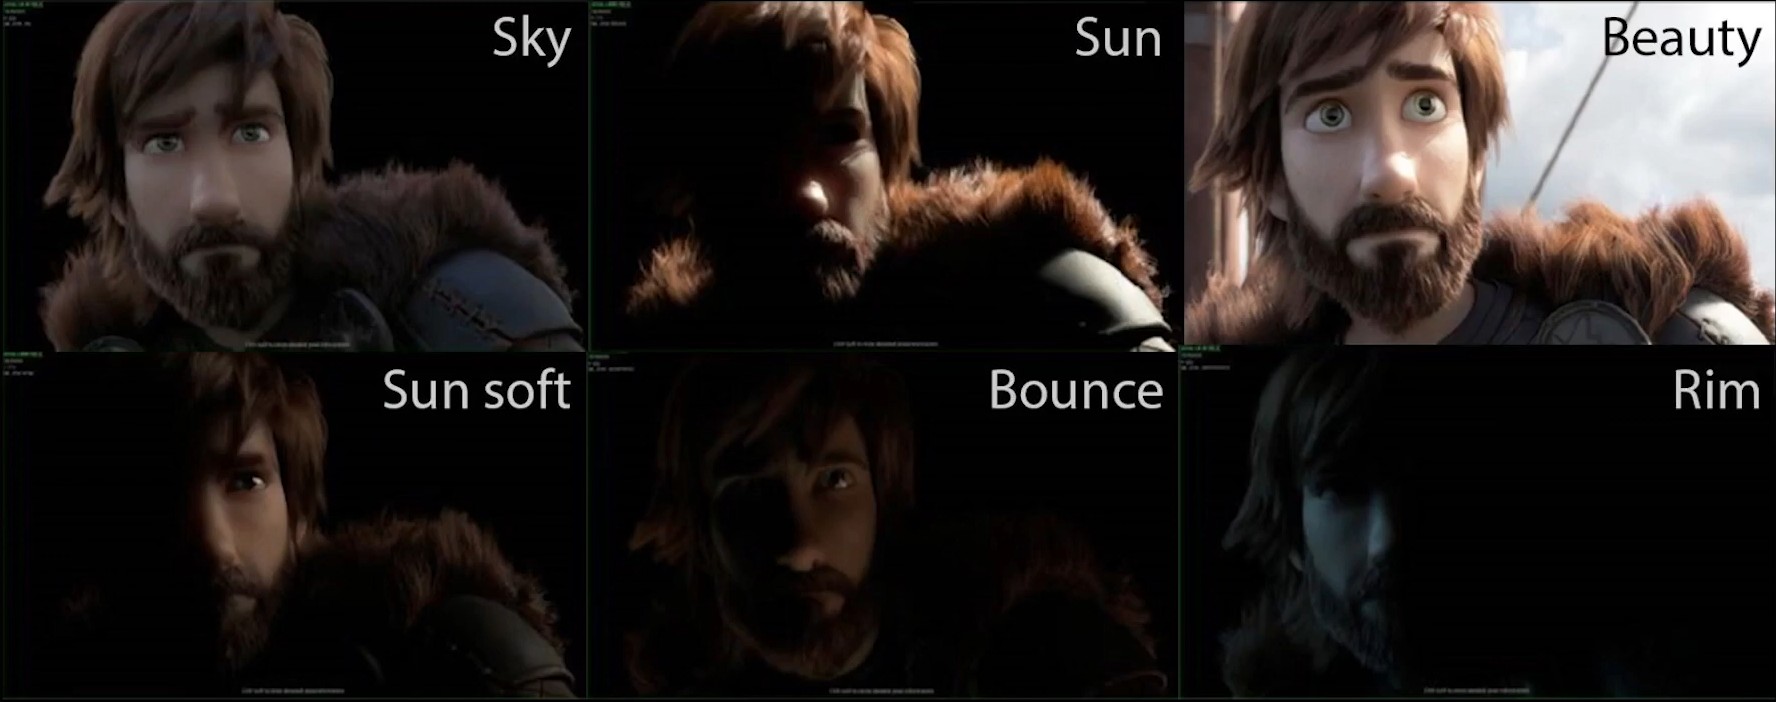
3 POINTS LIGHTNING SETUP:
La iluminación principalmente se basa en el triangulo formado por Key light, Fill light y Back light, luces extra y elementos en el entorno como niebla, texturas u overlays para añadir detalles.
También pueden adaptarse otros esquemas de iluminación con 3 fuentes de luz
3 Lights Triangle:
- Key Light: Main light with more power that guide the others (45º front).
- Fill Light: Softer light focus on the other side to fill shadows (diffuse, bounced, other font light).
- Back light: Situated back to the character (separa el sujeto del fondo añadiendo profundidad)
Extra lights:
- HDRI (0.1-0.3 Strength): Create an enviorment light.
- Background light: Separate even more the subject to the background and create depth.
- Practical light: lights already inside the scene (lamps, phones, flames..)
- Motivated light: light that pretend to look natural light in the scene powering a practical light.
- Bounced light: a light that dont impact directly to the subject bouncing before in an object.
- Catch light: light used to creat shines in the eyes of the subject finding the pefect angle.
- Hair light: light used to light the hair
- Superior light: very large light from above for the general more.
Enviorment details:
- Bubbles, dust or general noise into the scene.
- Volume (fog) to scatter these light for a softer look (Very imporant)
- Use texture lights and gobos
CINEMATIC LIGHTNING
Para conseguir renders cinemáticos importa la cámara, detalles y atmosfera pero lo más importante es la iluminación.
La iluminación “cinemática” no es necesariamente “realista” sino que se refiere a un estilo asociado en el cine por su atmosfera y profundidad, para ello usan técnicas como rebotar luces, usar luz difusa, ajustar la temperatura… con el propósito de contar una historia visualmente. En 3D suelen ser oscuros, misteriosos y con reflejos.
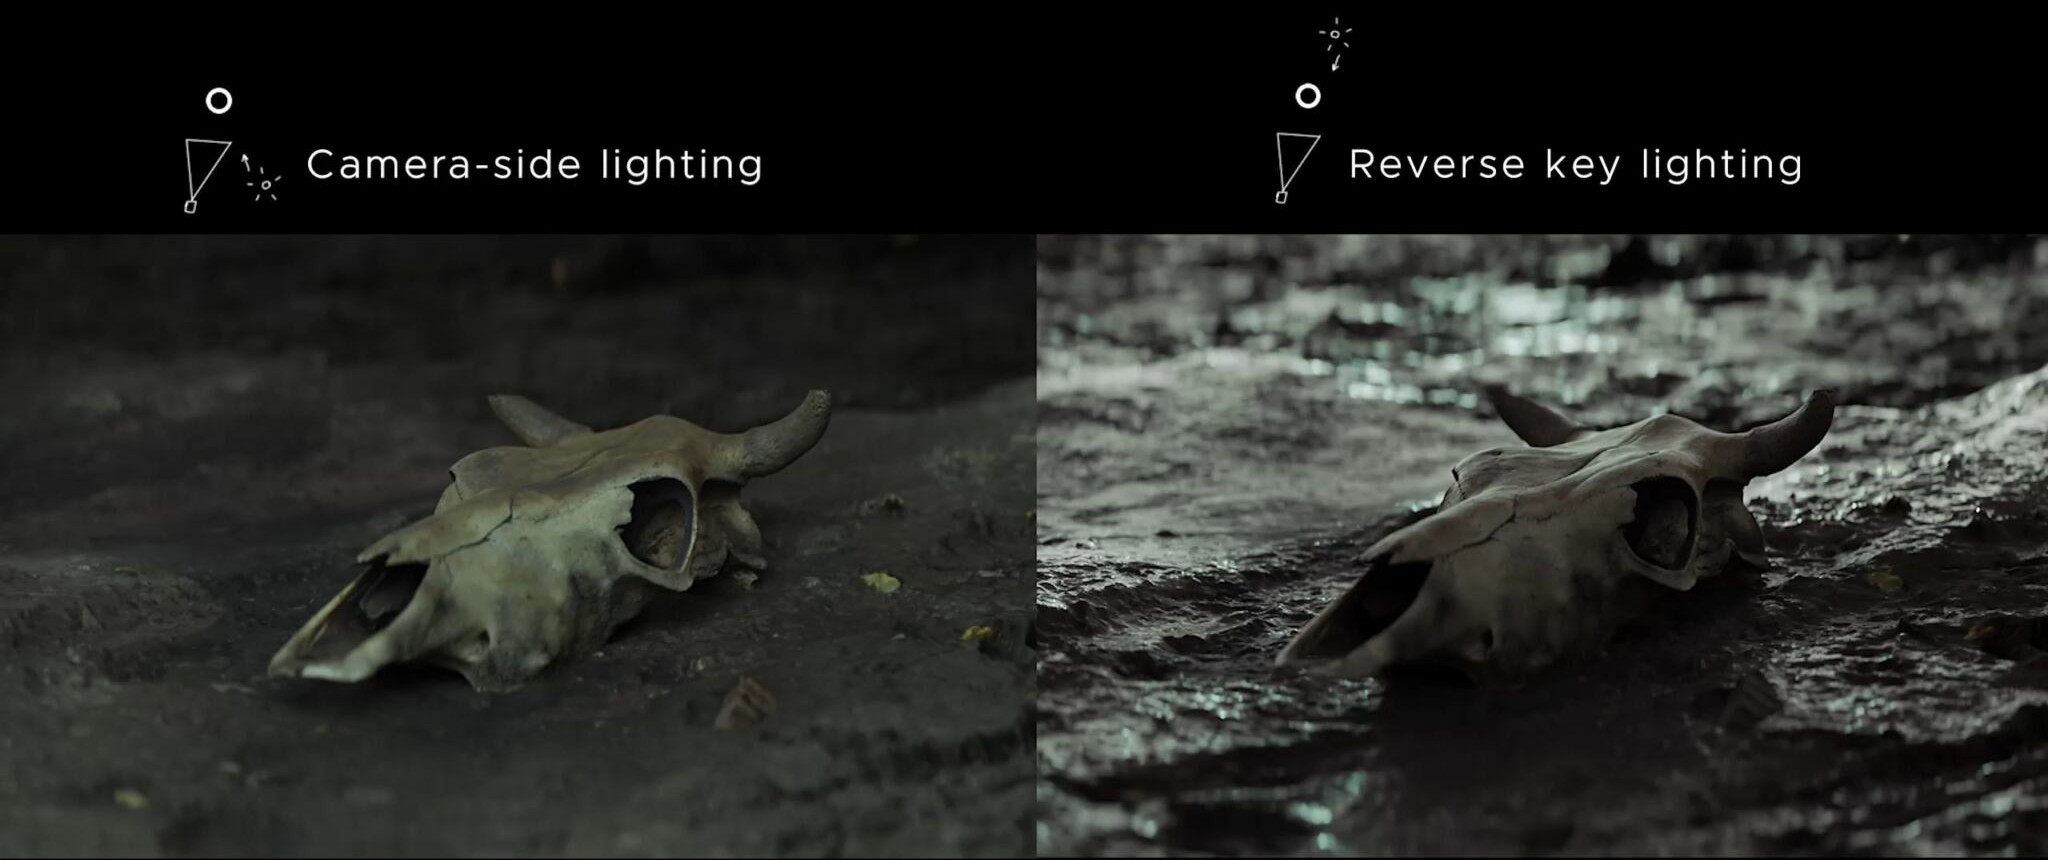
REVERSE KEYLIGHT:
Reverse, Upstage o Narrow keylighting, es un concepto es imprescindible para una iluminación cinematográfica.
Consiste en mantener el personaje oscuro desde el punto de vista de la cámara de la cámara; evitar posicionar la luz frontalmente, ya que crea una iluminación plana.
Esta tecnica crea mayor contraste; sombras profundas dando la sensación de profundidad, Definición de las formas; luz contorneando la silueta y Estetica de film noir, retratos epicos o un estilo rembrand/drama.
En lugar de iluminar el sujeto desde el lateral de la cámara, se coloca la luz principal del lado opuesto a la cámara y otra luz lateral; a 45º grados de la cámara.
Modificar power y spread para conseguir buenos highlights
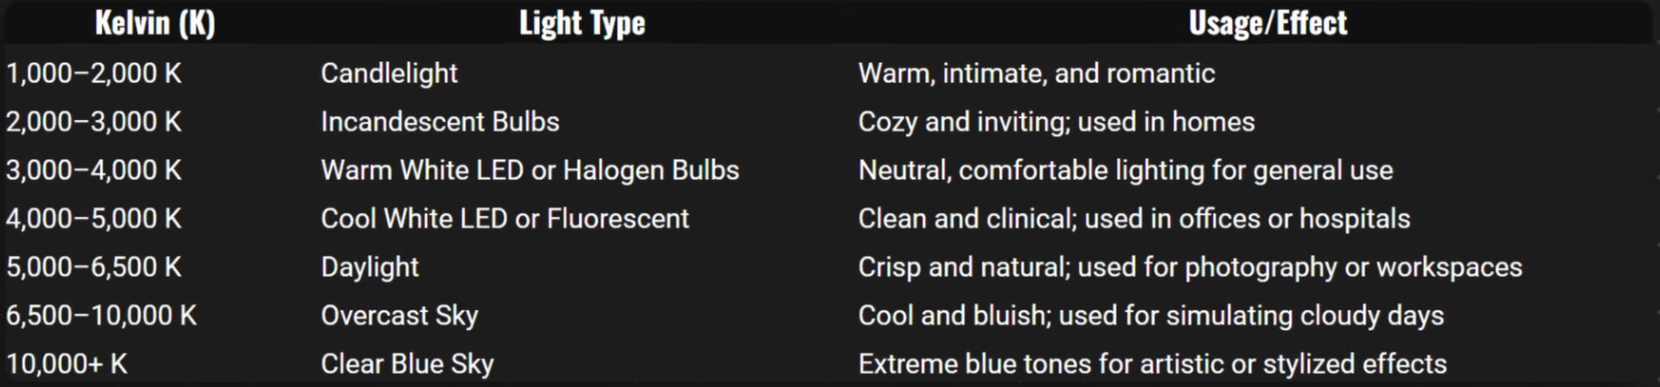
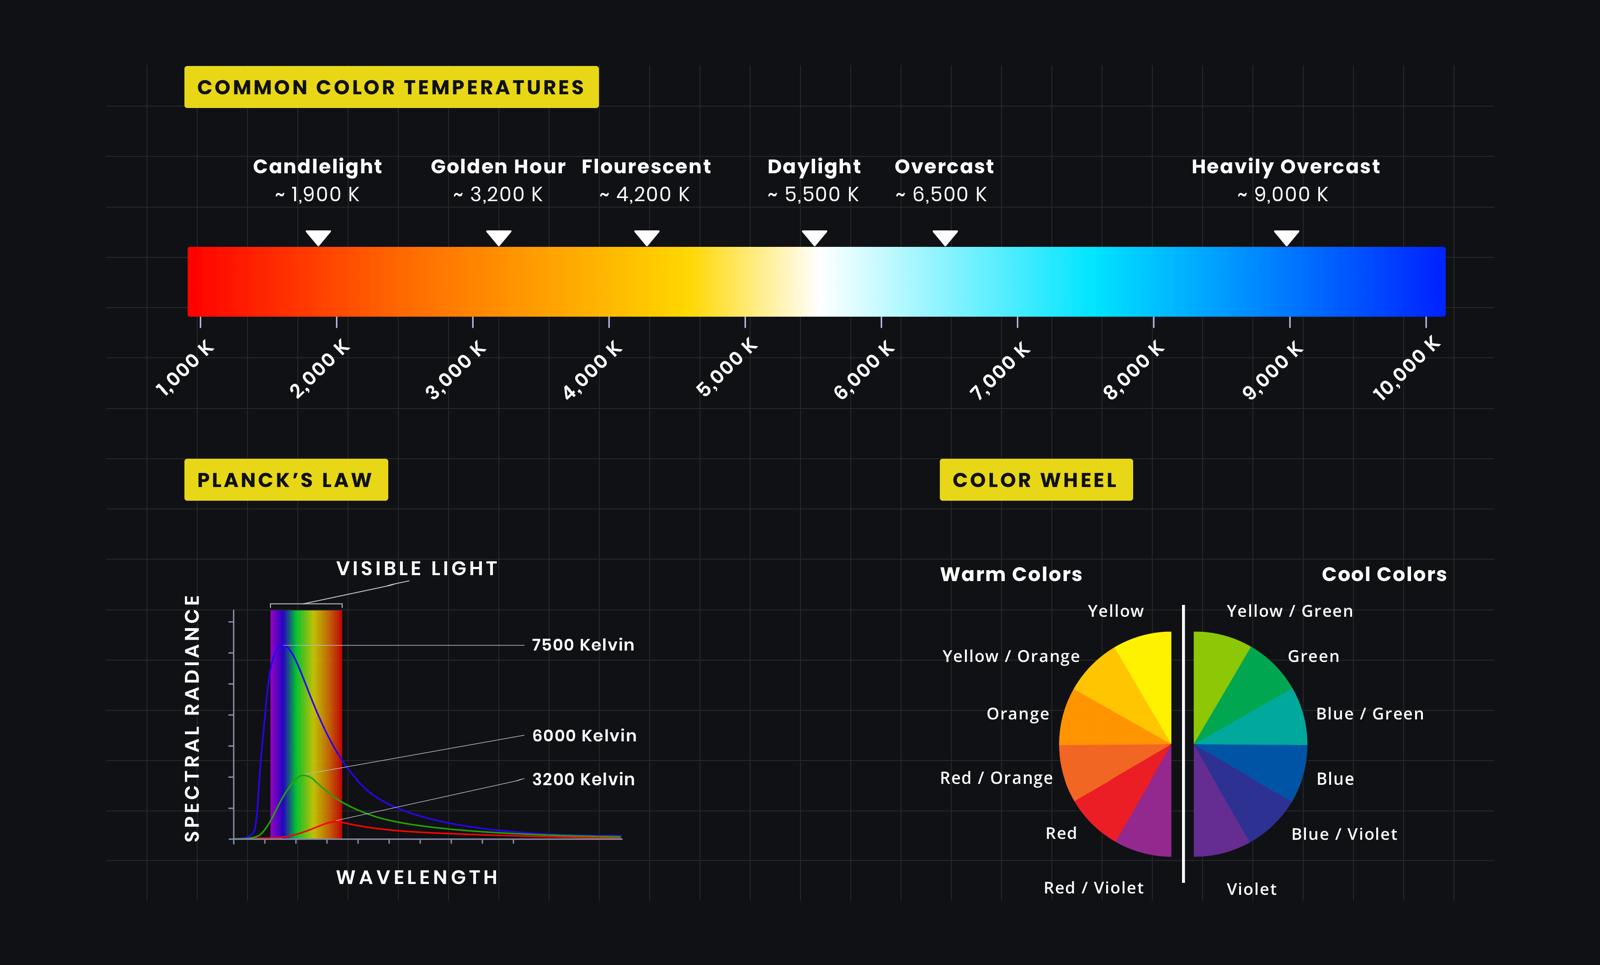
COLOR LIGHT TEMPERATURE
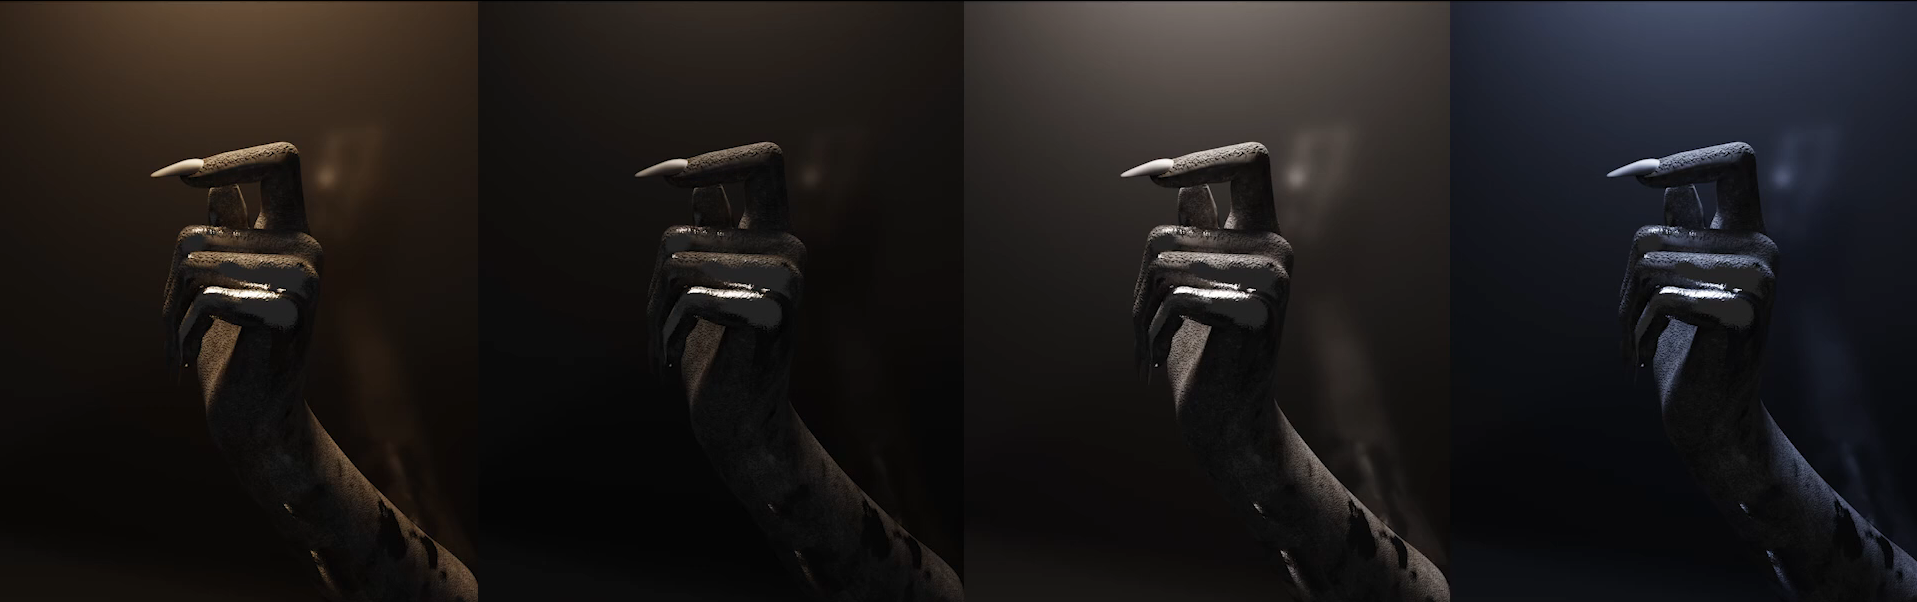
Para modificar la temperatura de una luz en Blender hay que ir a sus propiedades y seleccionar “use nodes” y en el shader editor conectar un nodo “blackbody” al input color de “Emission” modificando el valor de “Temp”
Armonías de color:
- Usar Adobe color para elegir una paleta de color
- Seleccionar el color principal para la luz principal y el resto de la paleta para las otras luces
VIEWPORT TIPS:
- Viewport: reducir los Samples (200 aprox) y activar Denoise para agilizar el proceso
- Render: Aumentar Samples (1000 aprox) esto aumenta el tiempo pero también la calidad del render (ajustar a la complejidad de la imagen, a más simple menos Samples)
- Format Resolution: la resolución y duración de renderizado dependerá de la complejidad de la escena.
- World Light: Reducir strength en world properties a 0 para oscurecer la escena.
Tipos de iluminación en Blender:
1. Lightning with HDRI:
Los HDR son iluminaciones globales que replican iluminaciones de entornos reales como estudios, habitaciones, fabricas.
- Algunos paginas para conseguir HDRs son: www.texutes.com www.polyheaven.com
- En “Shader Editor” seleccionar el tipo “World”
- Clicar en el Nodo “Background” y hacer Ctrl+T para añadir los nodos necesarios
- Seleccionar el archivo HDR en el nodo “Enviorment Texture”
- Modificar el valor de los nodos para generar diferentes iluminaciones
2. Lightning with Sky Texture:
Los Sky Textures son muy parecidos a los HDR pero permiten mayor modificación y posibilidades como crear nible, rayos de luz.
- Permiten modificar el tamaño del sol, intensidad, altitud, rotación, añadir aire, polvo, atmosfera
- En “Shader Editor” seleccionar el tipo “World”
- Conectar un nodo “Sky Texture” al color del Nodo “Background”
- Modificar el valor de los nodos para generar diferentes iluminaciones
3. Lightning with Lamps:
En el 3D Viewport Shif+A>Light y elegir entre los 4 tipos de lampara (Point, Sun, Spot, Area)
-
Point light: Se utiliza para iluminar secciones especificas de la escena, es general ya que ilumina en todas las direcciones.
-
Sun light: Es similar a Sky Texture sin embargo, ofrece menos posibilidades, ambas funcionan para crear un ambiente volumétrico. Para cambiar los parámetros del sol hay que hacerlo desde el panel de propiedades; color, intensidad, ángulo de incidencia.
-
Spot light: Es una luz direccional, como una lampara de techo, sirve para acentuar ciertos lugares de la escena.
-
Area light: lampara cuadrada que ofrece muchas posibilidades, su luz afecta de forma muy diferente según su tamaño
4. Others
-
Emission Objects: Cualquier objeto puede convertirse en una luz añadiendo un emission shader, util para iluminaciones creativas como neones y objetos brillantes.
-
IES Textures: Texturas que simulan patrones de luces artificiales, para usarlos hay que ir al shader editor, añadir un nodo IES Texture y conectarlo a Stregnth del nodo de la luz.
-
Gobos Texturas posicionadas delante del foco de luz para proyectar sombras simuladas, como humo, hojas.
-
Volumetrics: Añadir un shader “Principled Volume” a un objeto como un cubo permite crear efectos como niebla, rayos de luz, estar bajo el agua.
-
Light/Shadow linking: opción dentro de las propiedades de la luz para definir que objetos serán afectados por la fuente de luz; Light Properties>Shading>Light Linking.
-
Reflection Objects: un objeto puede utilizarse para rebotar la luz y reducir las sombras, dentro de sus propiedades Ray Visibility> puede desactivarse “Camera” y “Shadow” para ocultarlo.
Real Light Properties:
UNIDADES REALES:
- Lúmenes (lm) for emissive source of light (luz total emitida por una fuente)
- Luminancia (lx) for the illuminance of a surface (1 lm/m²) (cantidad de esa luz en una superficie)
UNIDADES EN BLENDER CYCLES & EVEE
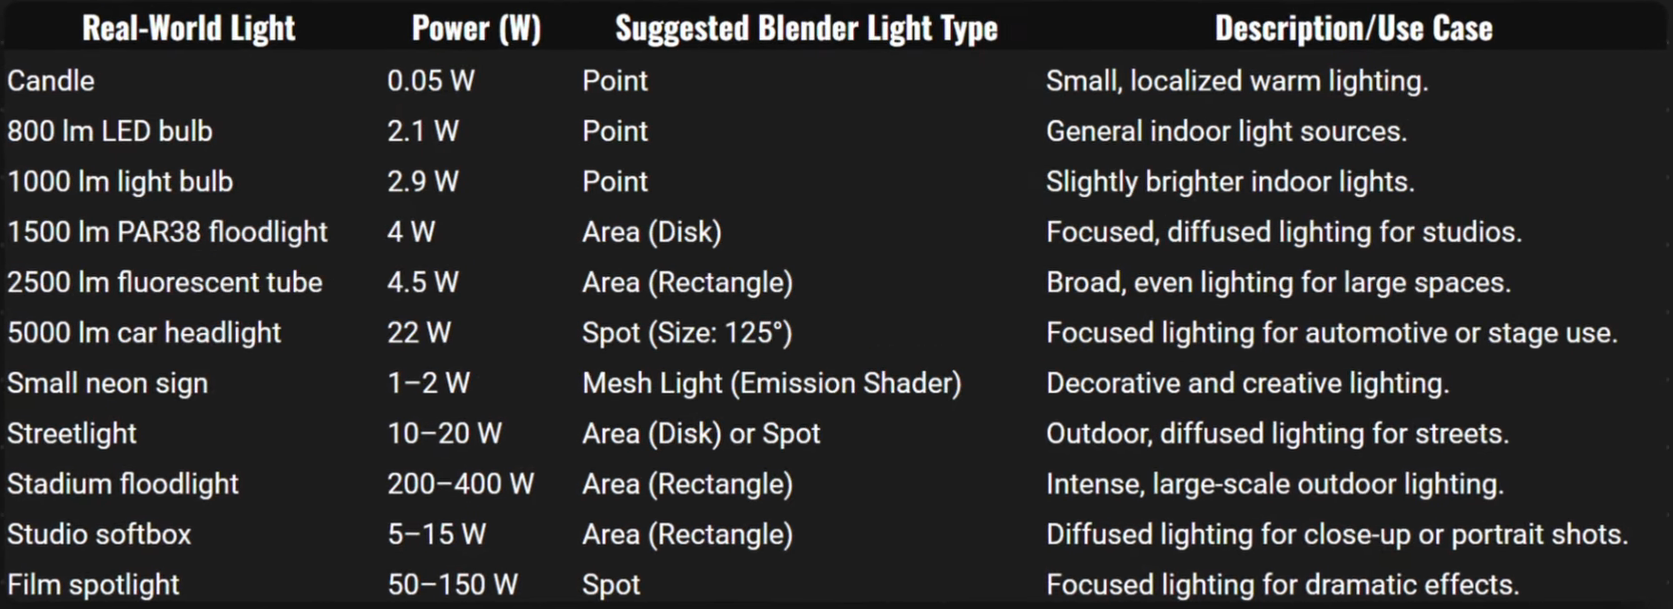
- Lúmenes (lm) - Point / Spot /Area
- Vatio/m2 (w/m2) - Sun
- lm + w/m2 - World (HDRI)
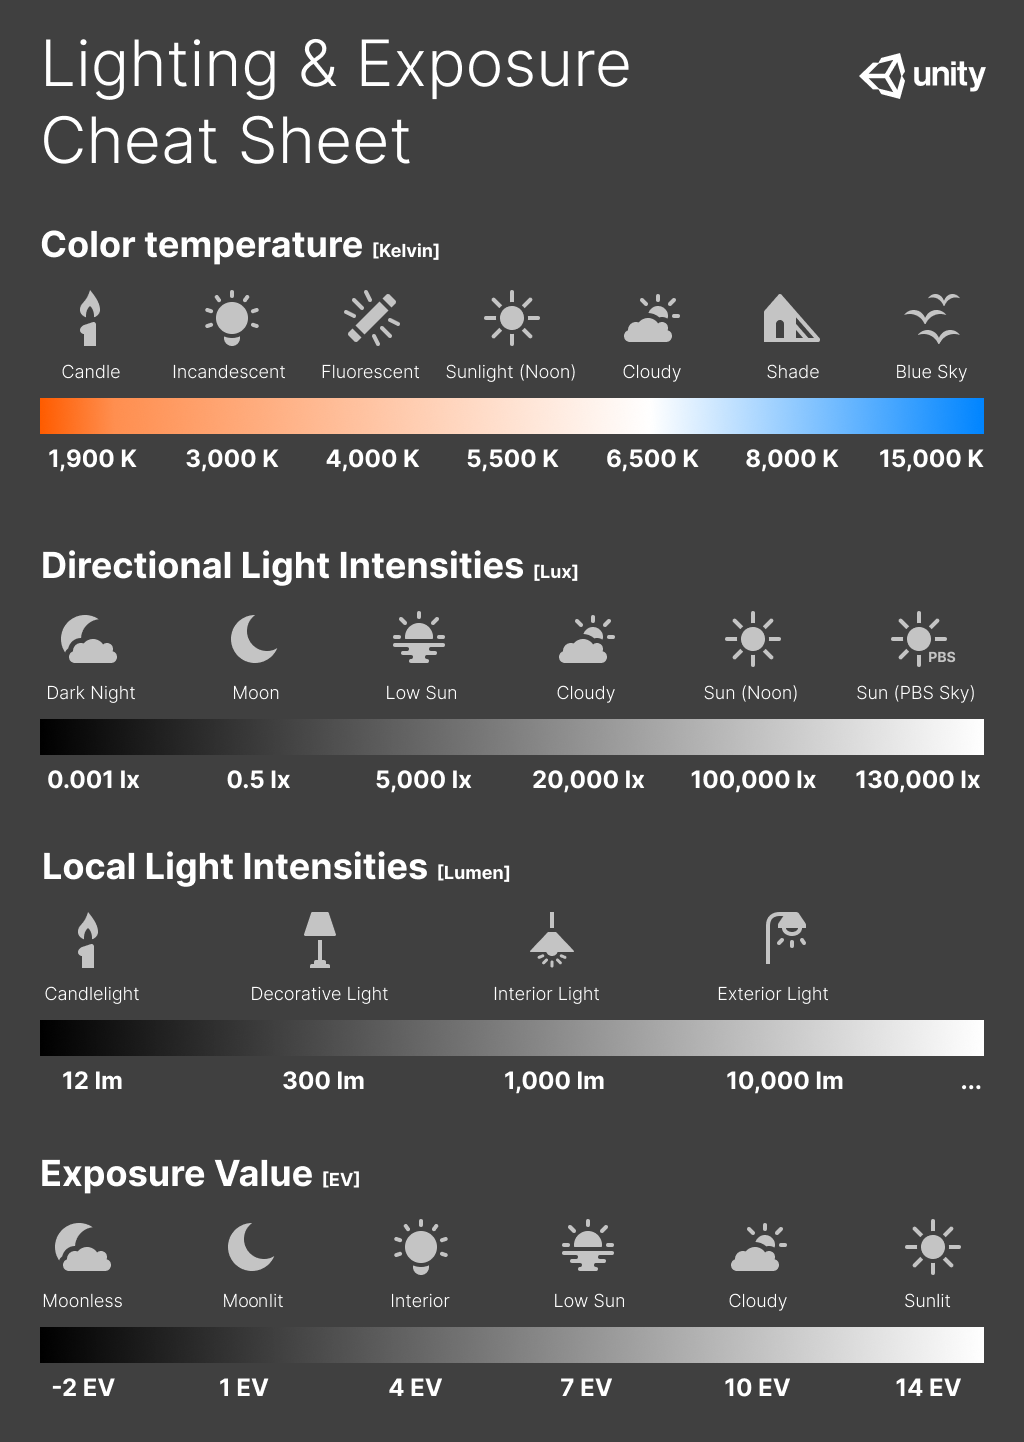
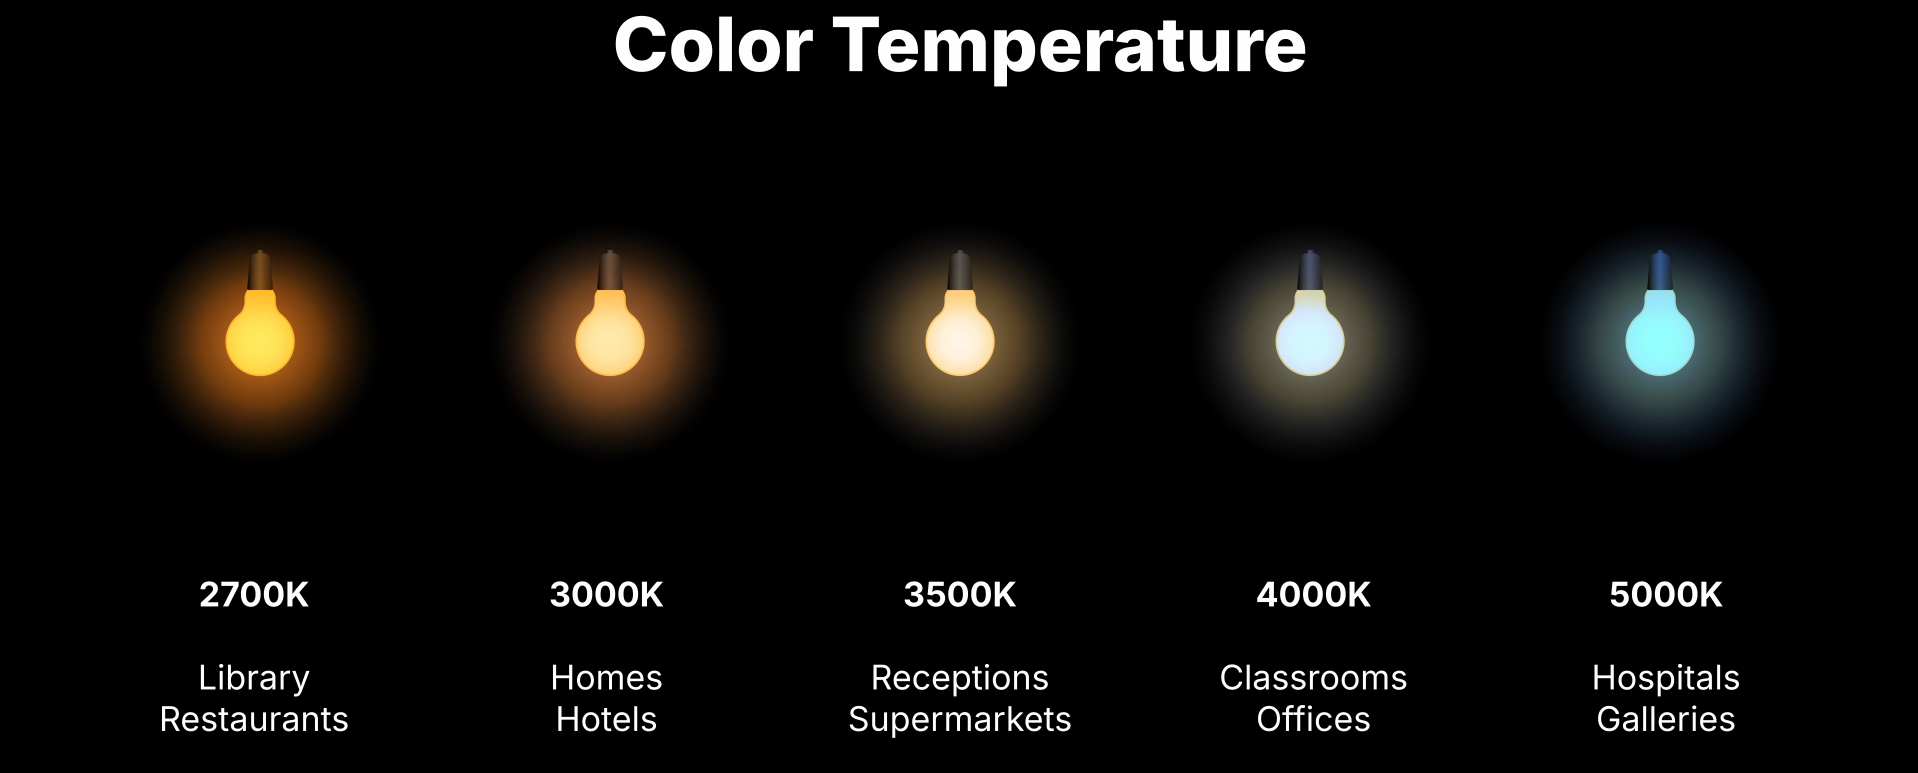
Common Temperature Values
Common Power Values
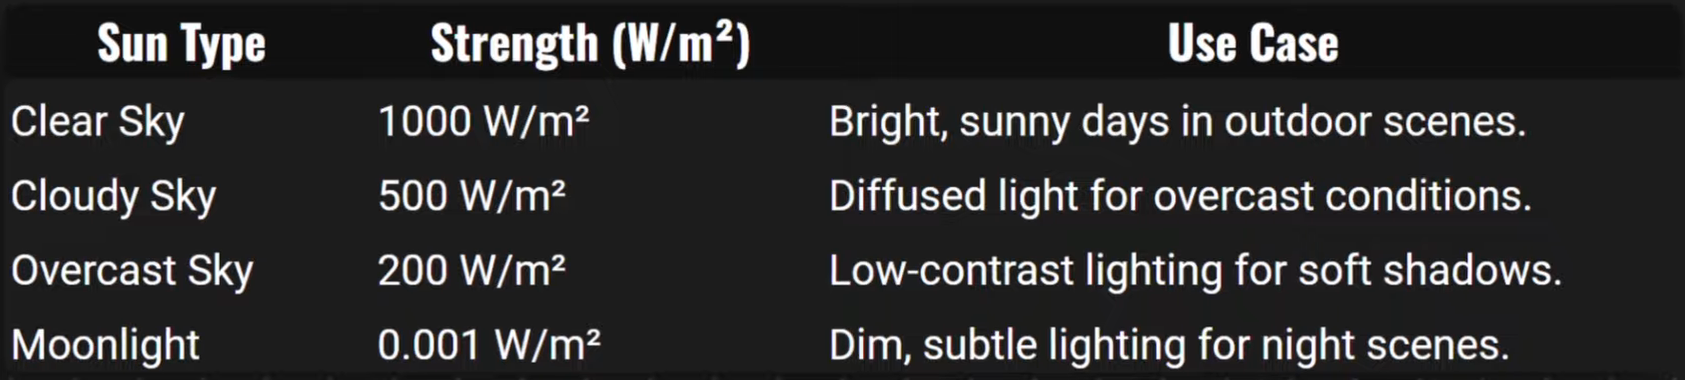
Common Sun Ligth Values
Lighting Cheatsheet
Before lighting anything, ask yourself:
- What’s the point of my render?
- Is there a story? If so, in what order should the viewer read the image?
- What should the viewer be focusing on?
- What emotion or mood should the viewer feel?
- What lighting styles could best suit this?
To Emphasize:
SHAPE AND FORM
• Soft shadows • Short Lighting (light the side of the model facing away from the camera)
TEXTURE
• Sharp shadows • Angle light across the surface
REALISM
• Natural colors (white, yellow, orange, blue) • Light from above
INTERESTING
• Exotic colors (not found in nature) • Light from below or side
General rules
- Put light where it matters (eg. make the face brighter than the feet)
- Add one light at a time, as needed
- Embrace shadows - they’re necessary to show the shape of the object
- Ensure at least one eye of a character has a catchlight (or it will feel dead)
- Shadows under the eyes look mysterious and scary - avoid it unless intentional
- Use rim lights to separate the subject from the background
Backgrounds
• Ensure it compliments the subject, not distracts it. • Use texture to help tell the story eg. wall with bullet holes behind a soldier • Use gradients to help guide the viewer eg. radial gradient behind their head
After finishing the lighting, ask yourself:
- Does this lighting flatter my subject?
- Is there a certain mood or feeling being portrayed? Is it the right one?
- Does it have impact?
- Is it appealing in some way?
PRODUCT LIGHTNING
# Light Wrangler ___
Documentation: https://superhivemarket.com/products/light-wrangler Shop: https://www.blenderkit.com/addons/7c4870a4-2ccf-4c18-b861-1b4670fdc343/
Render & Lightning
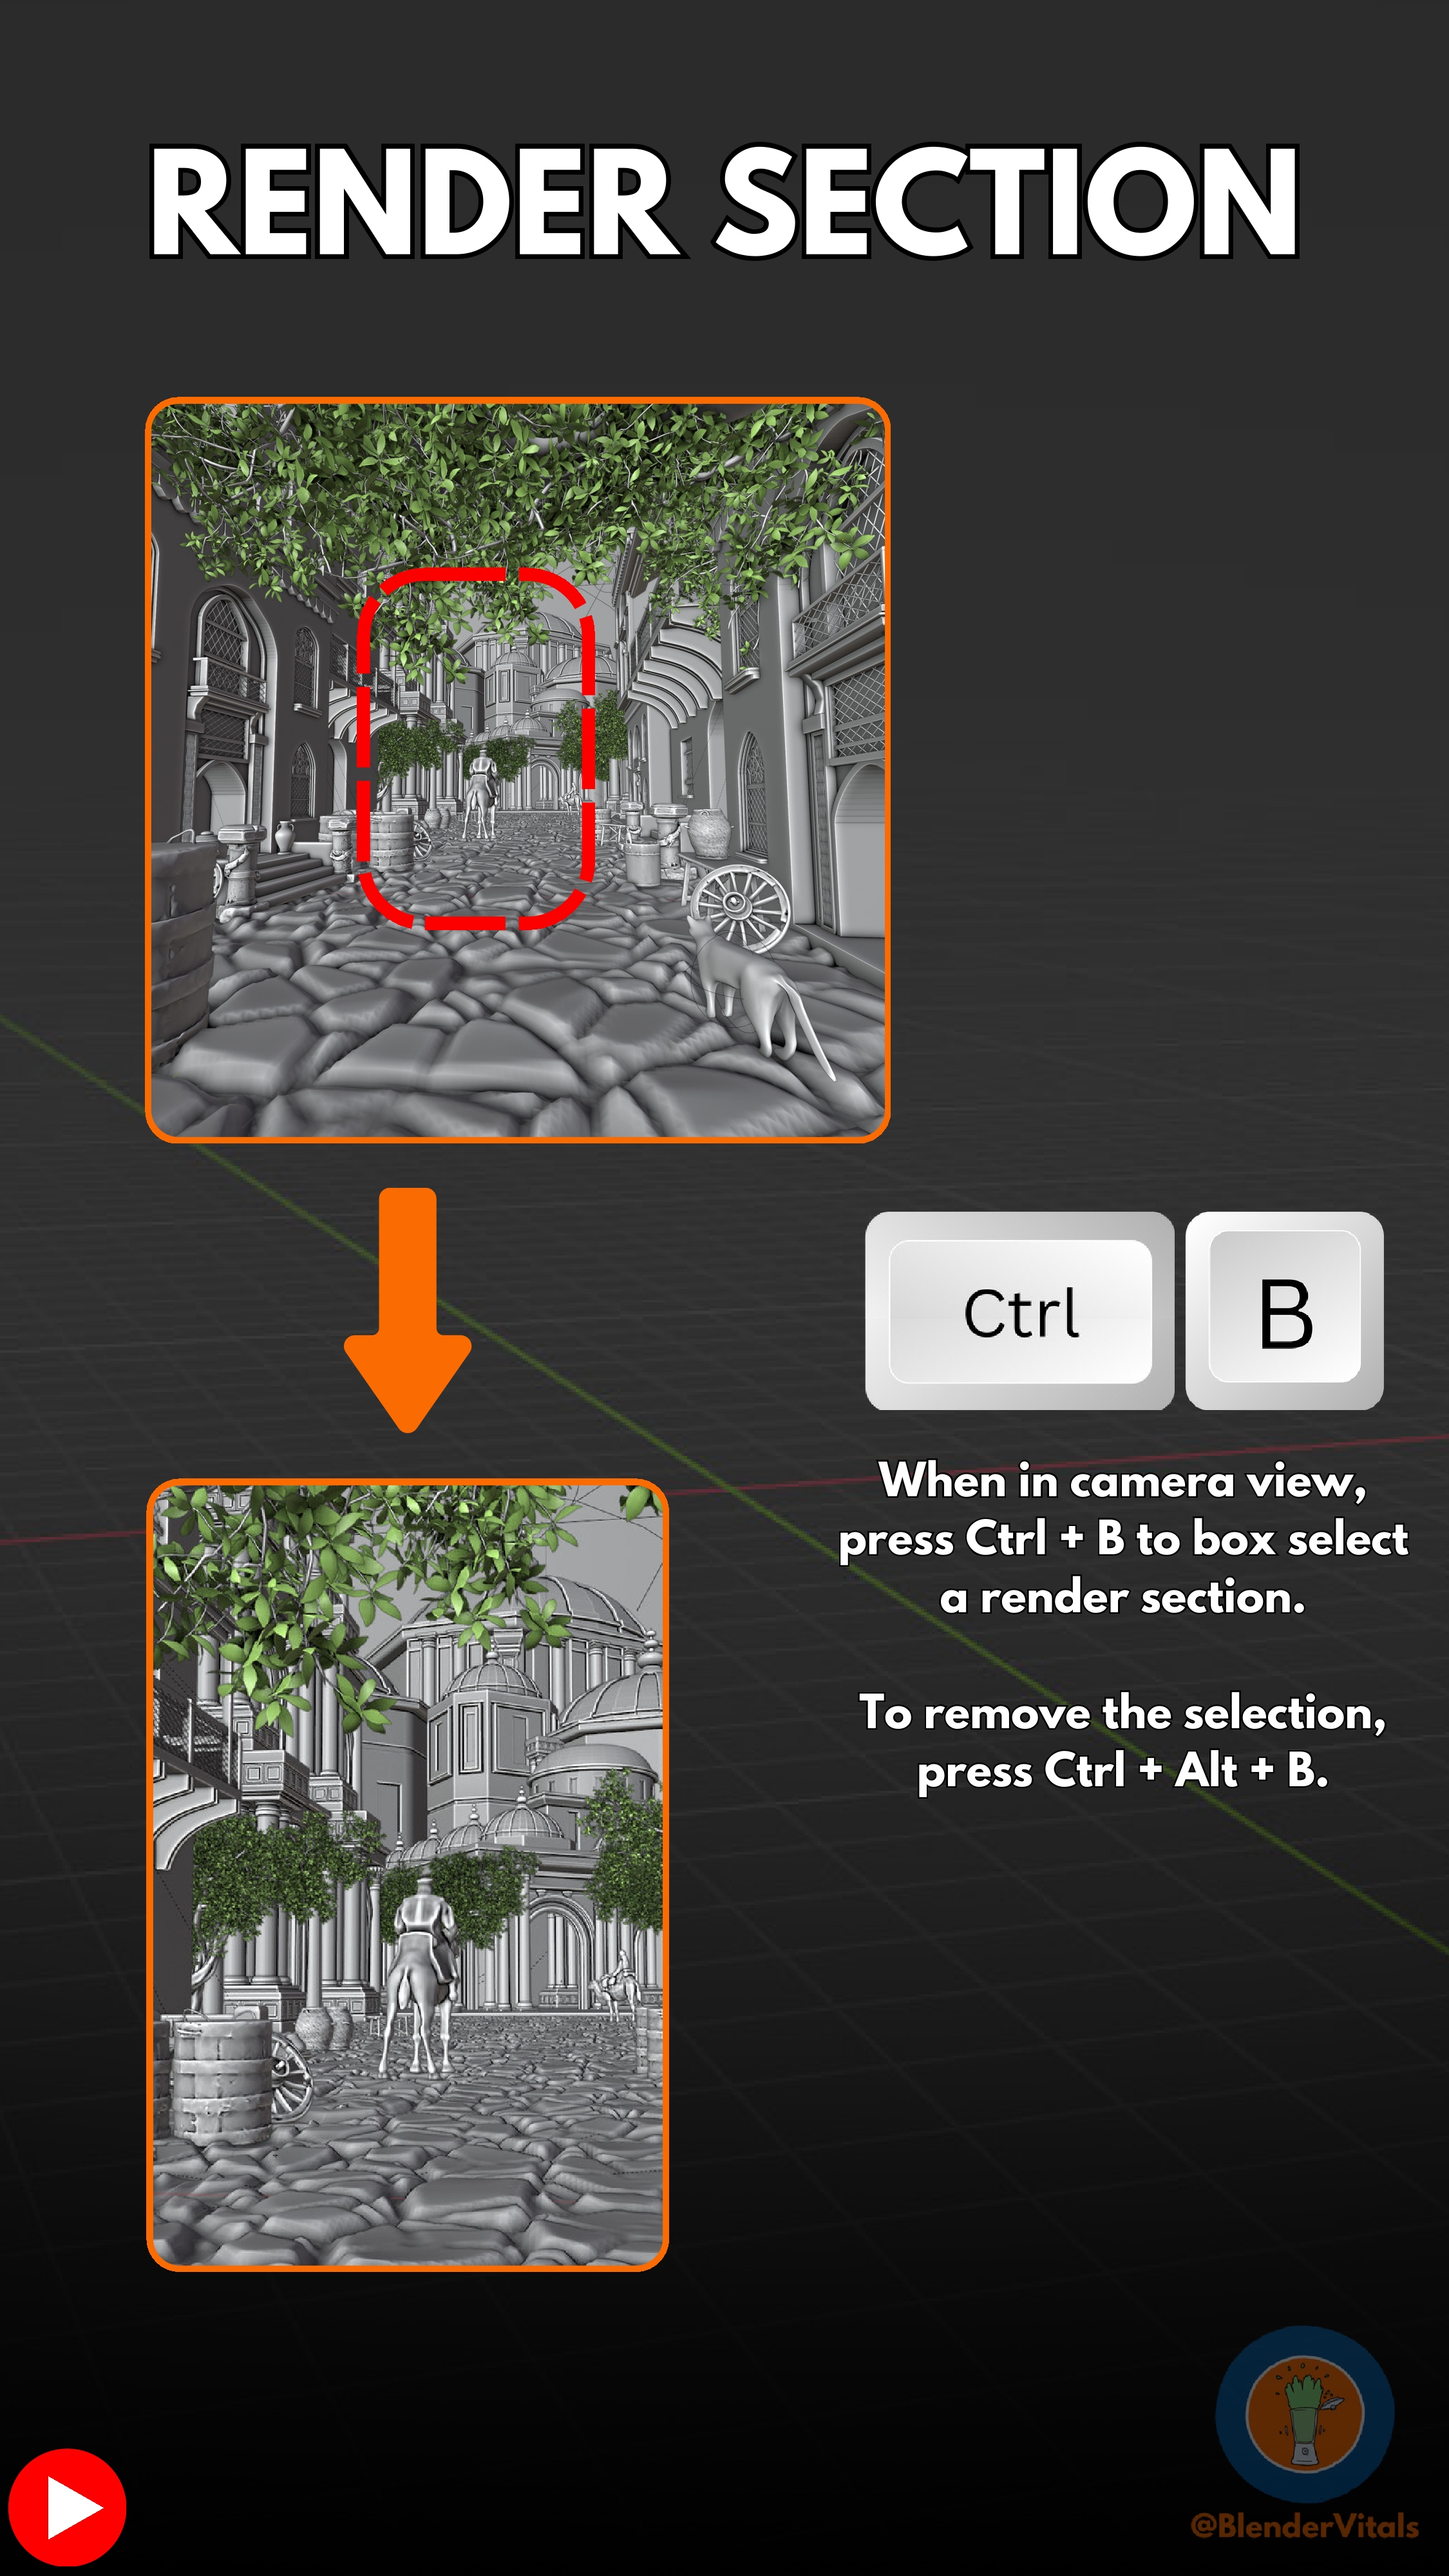

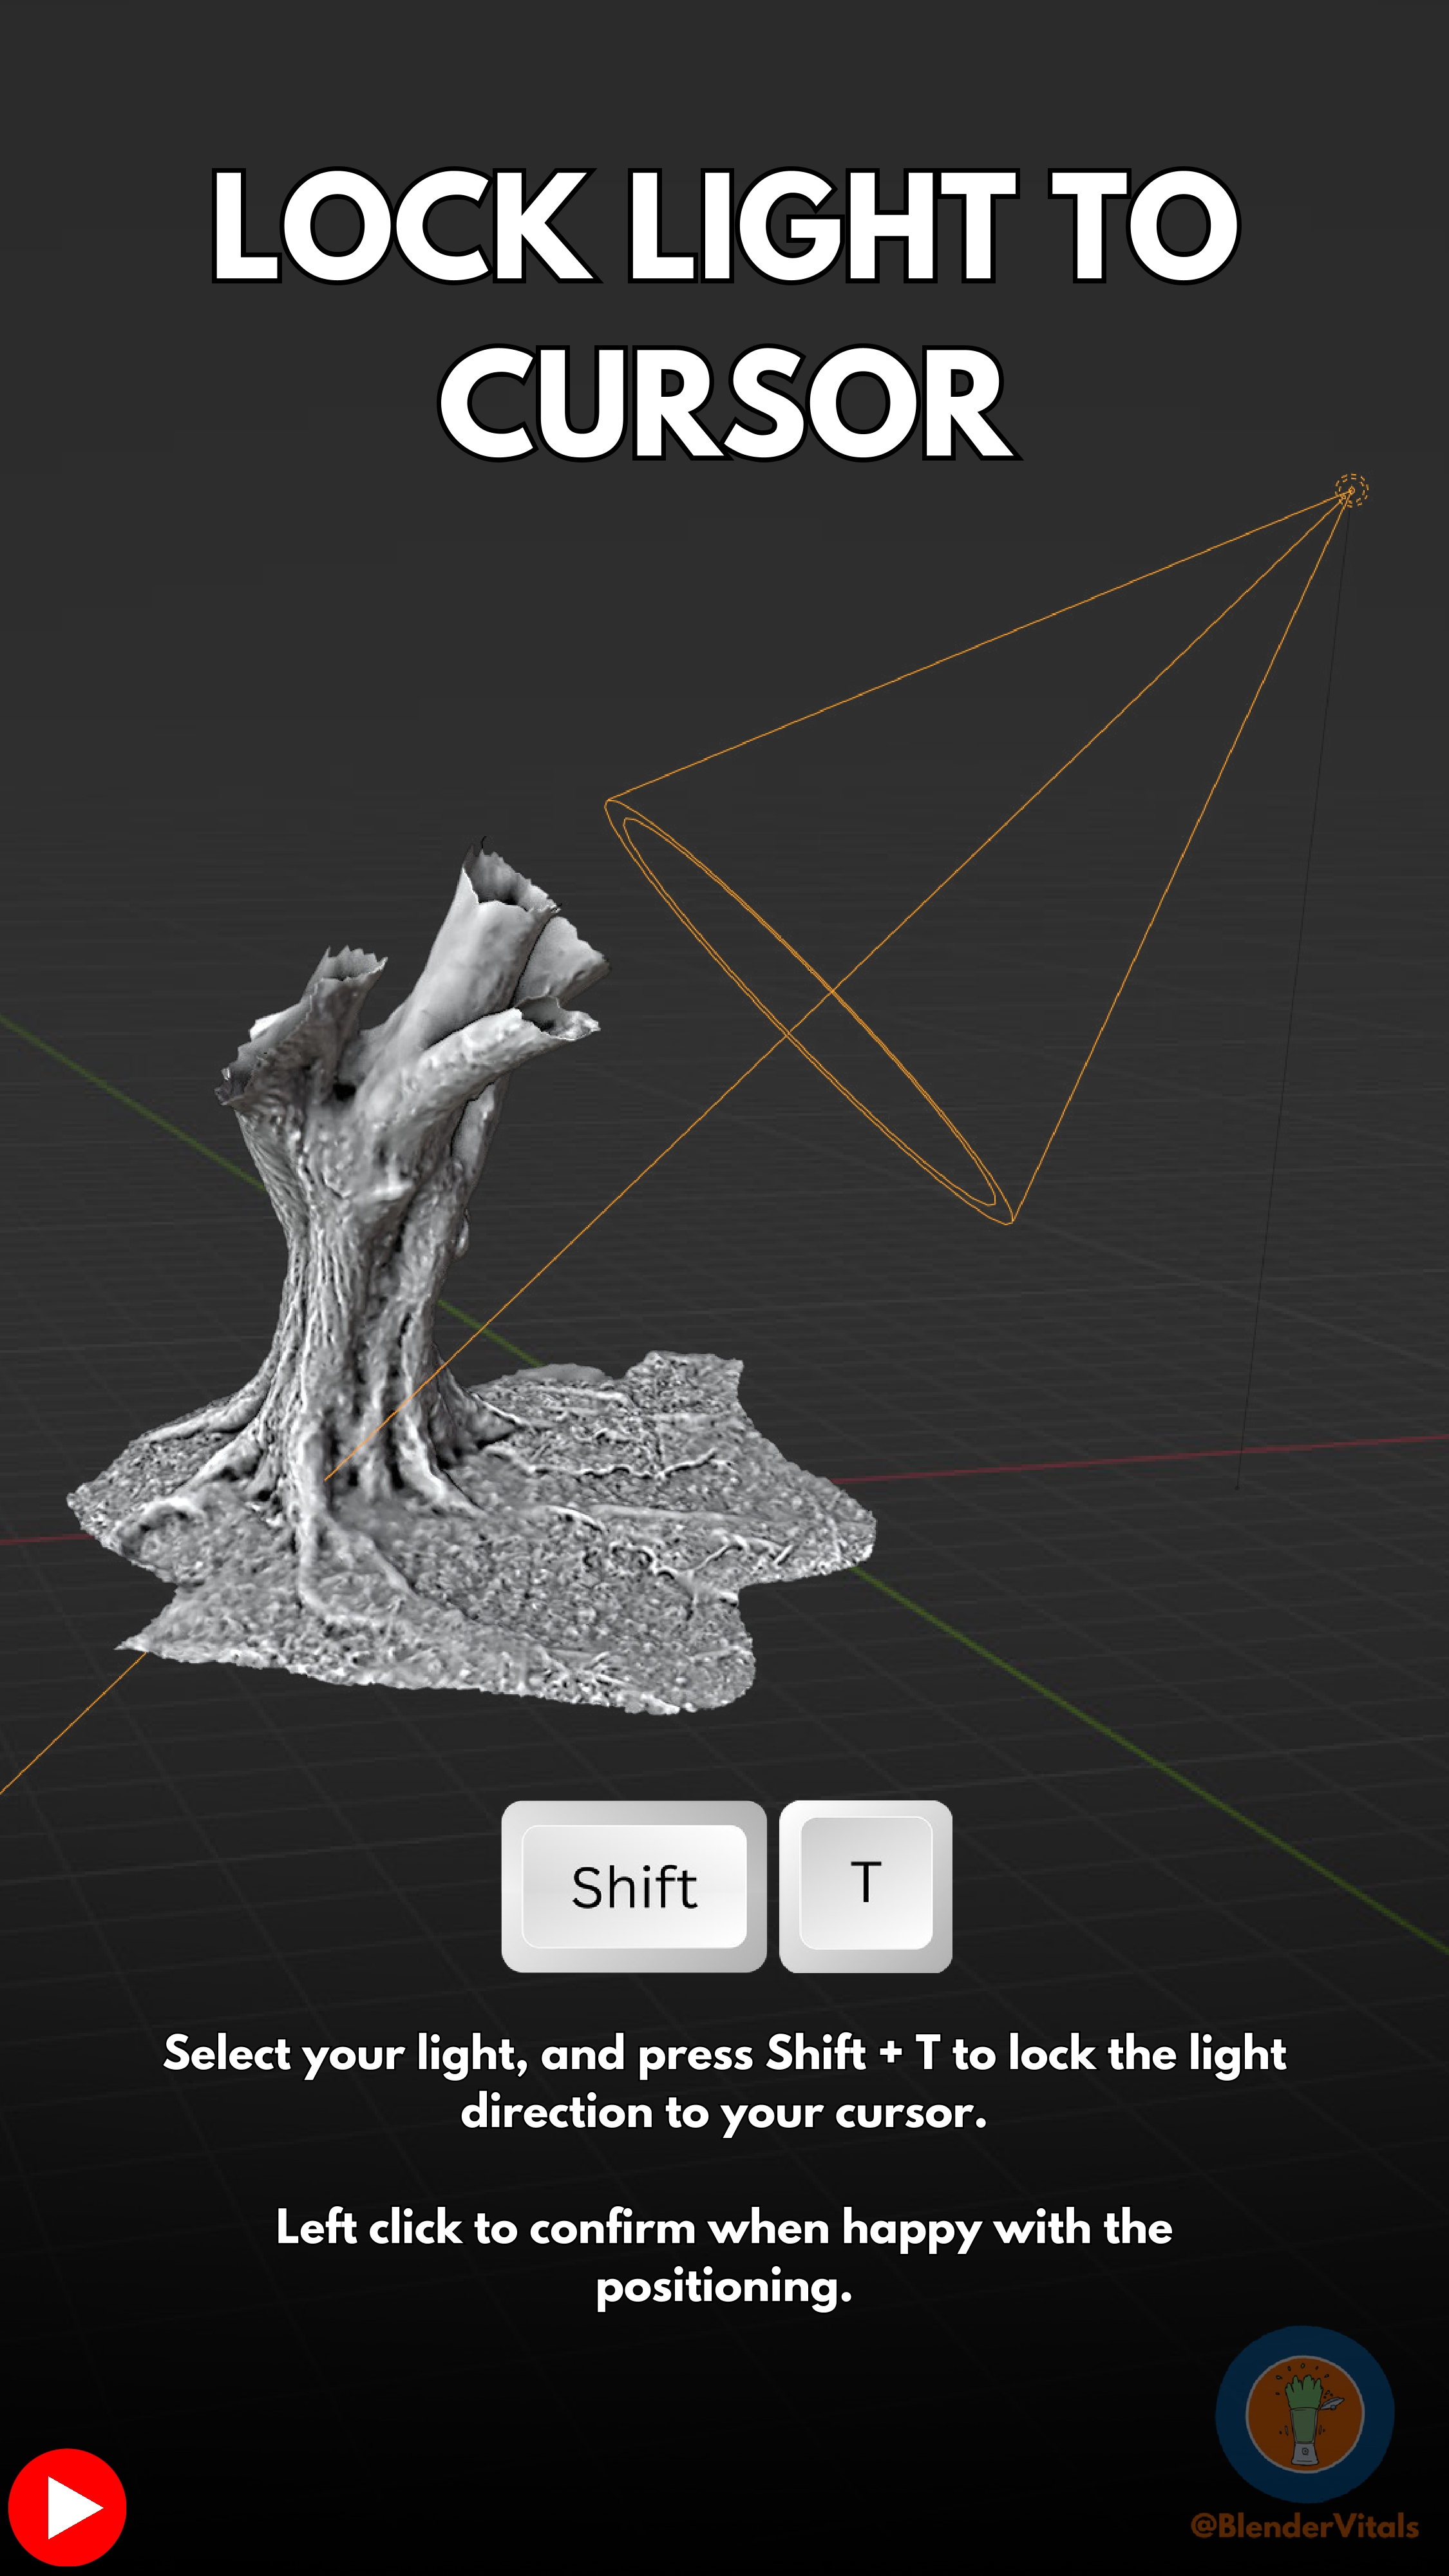
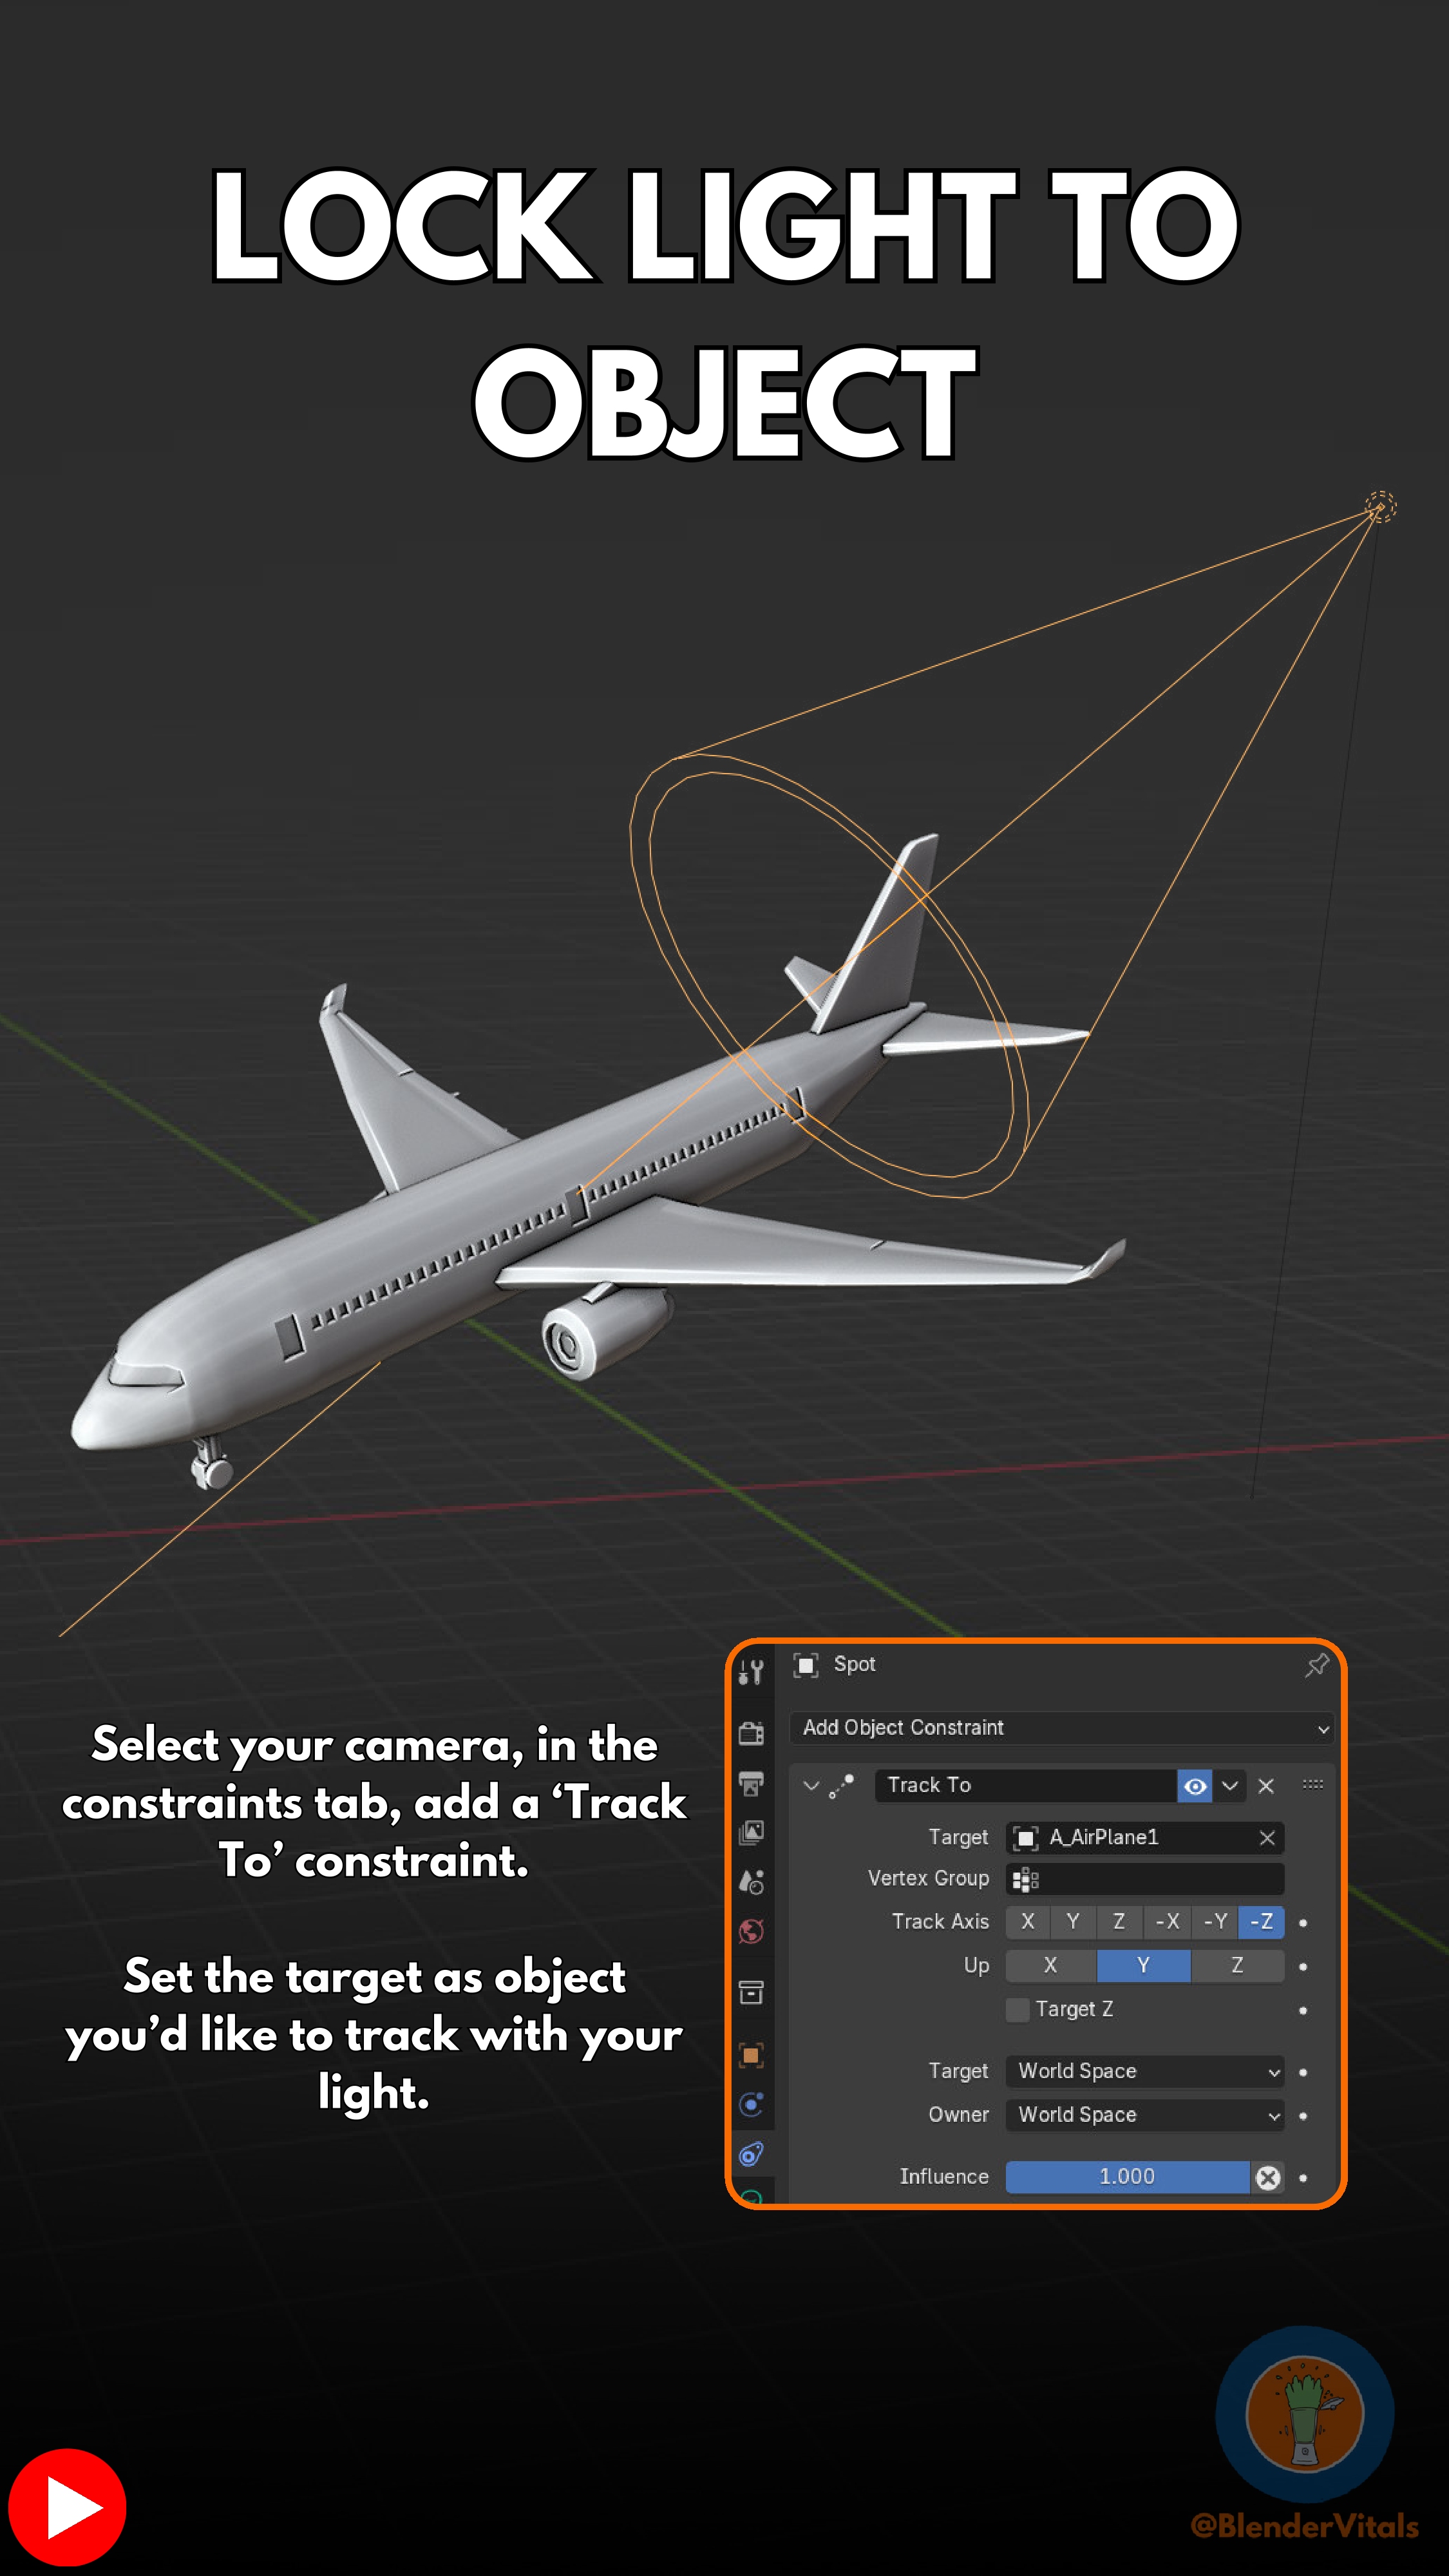
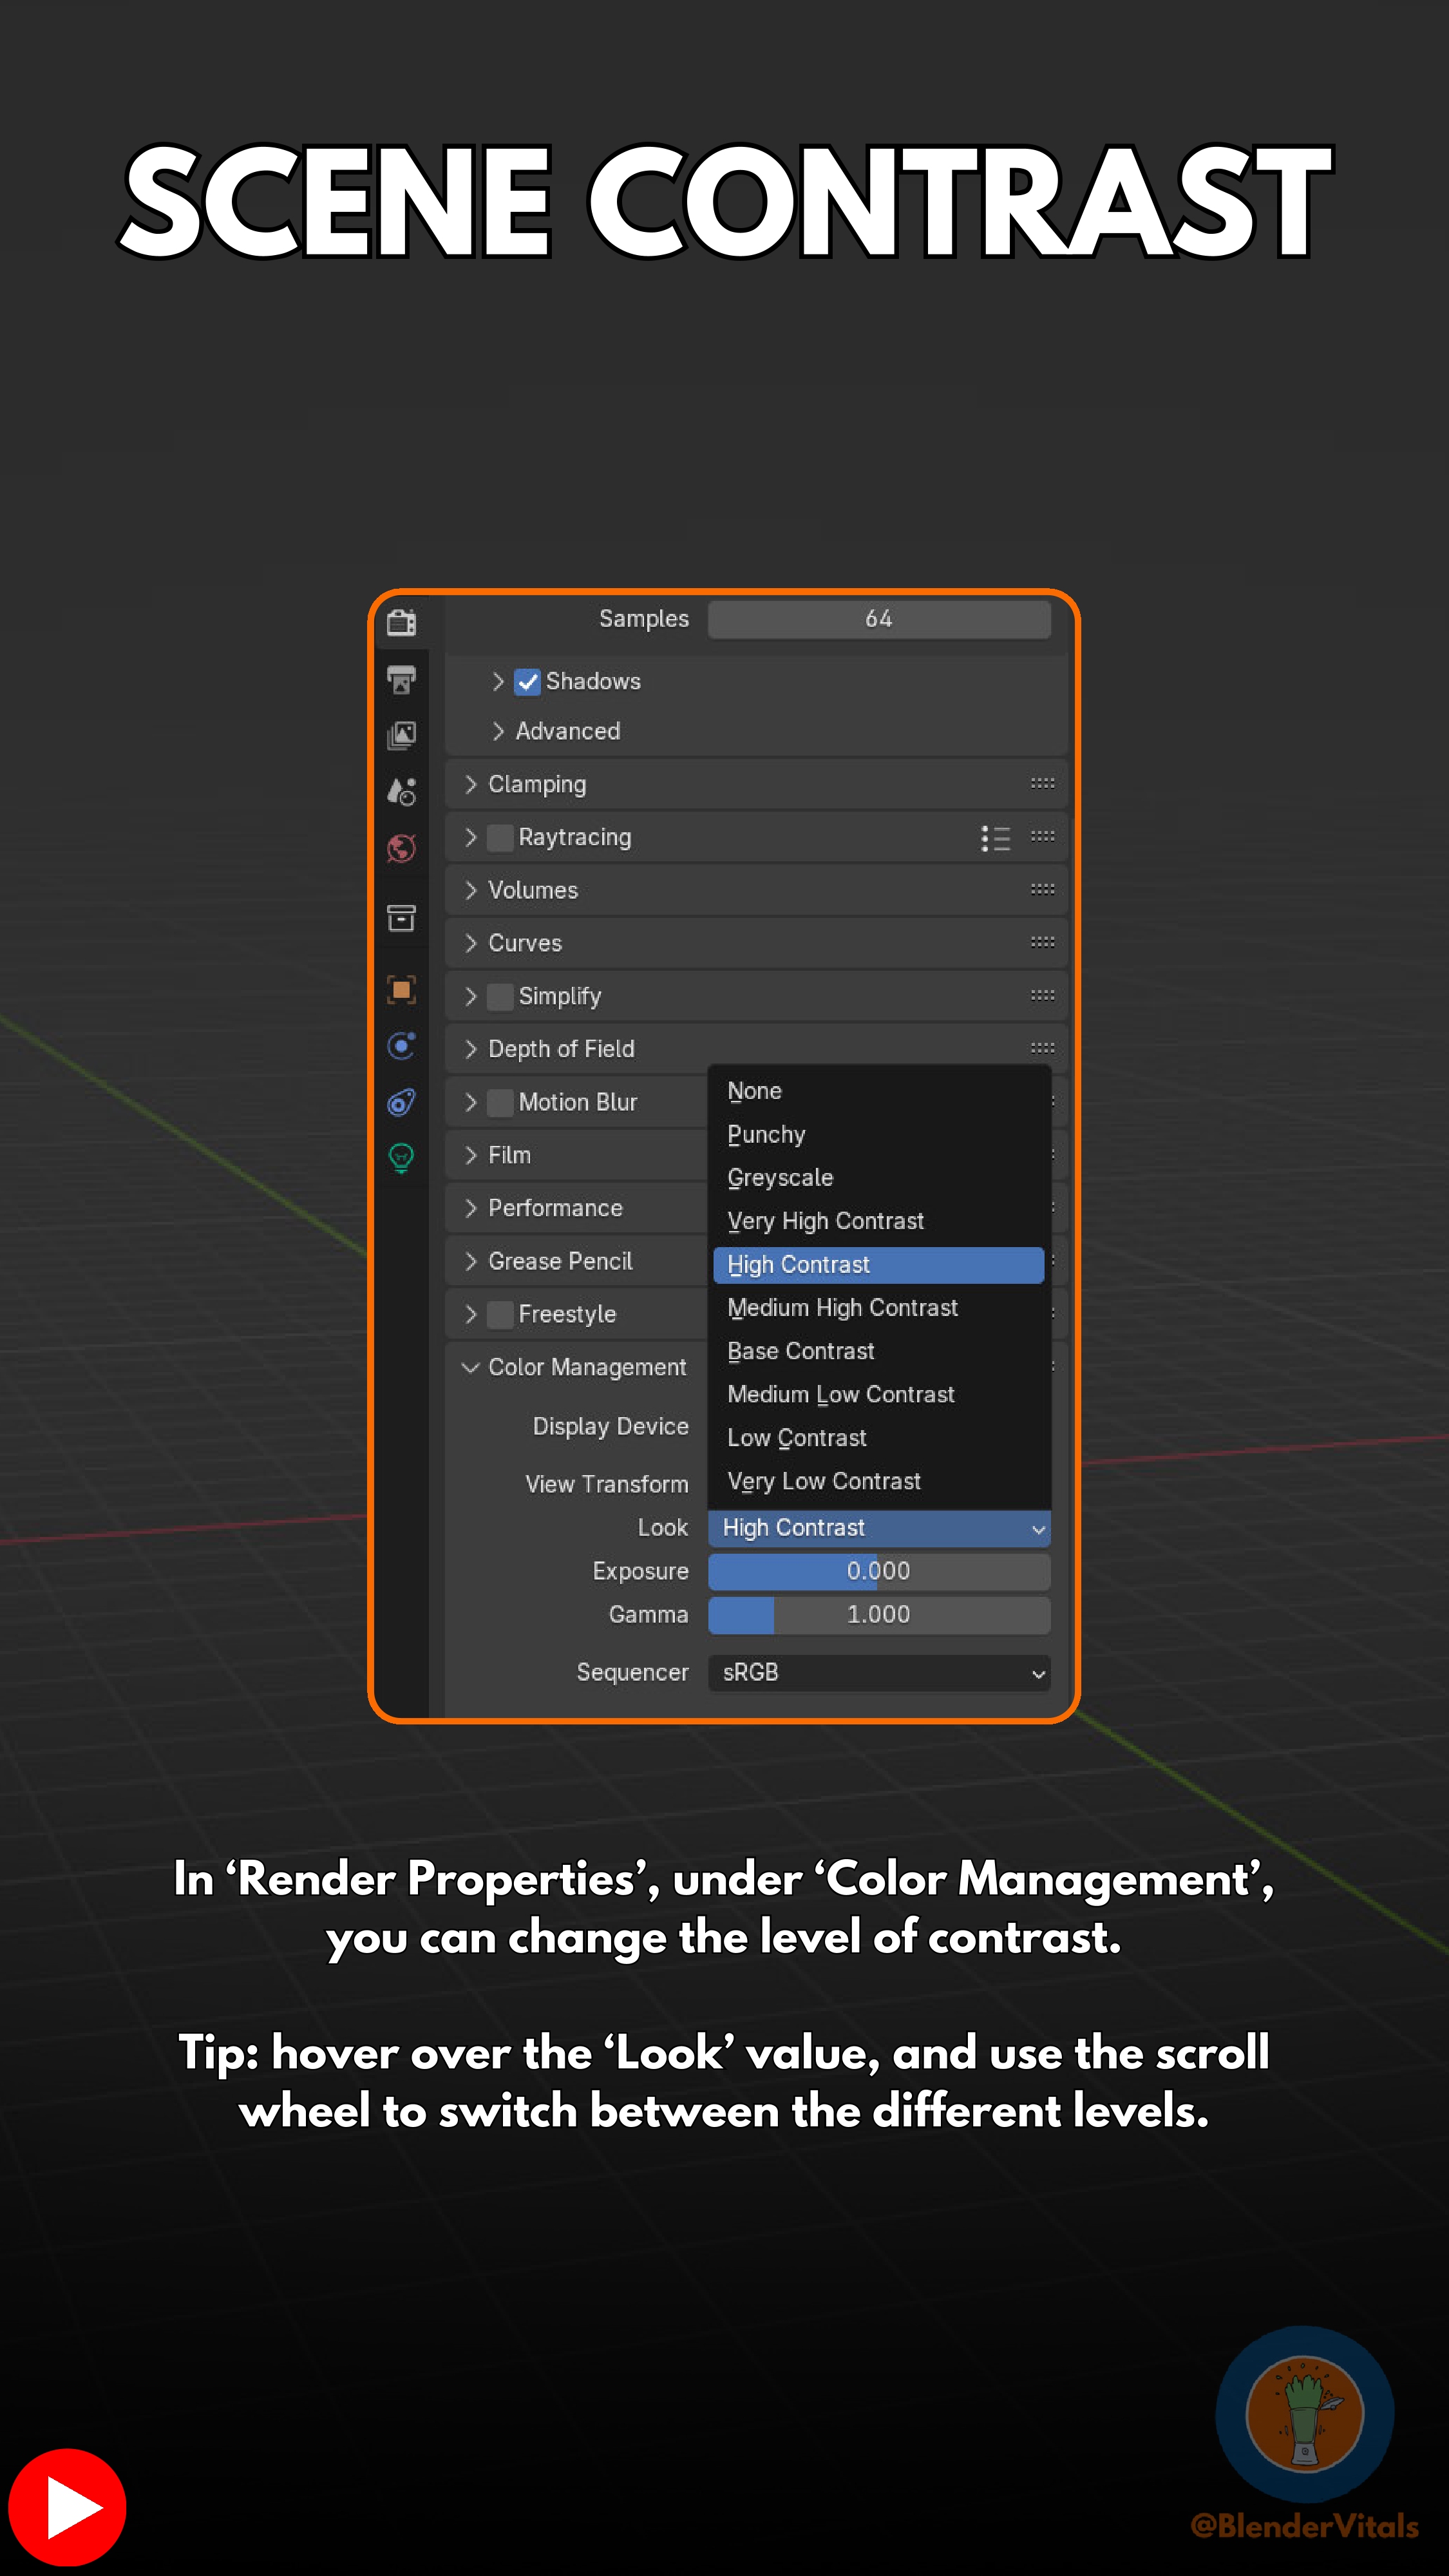
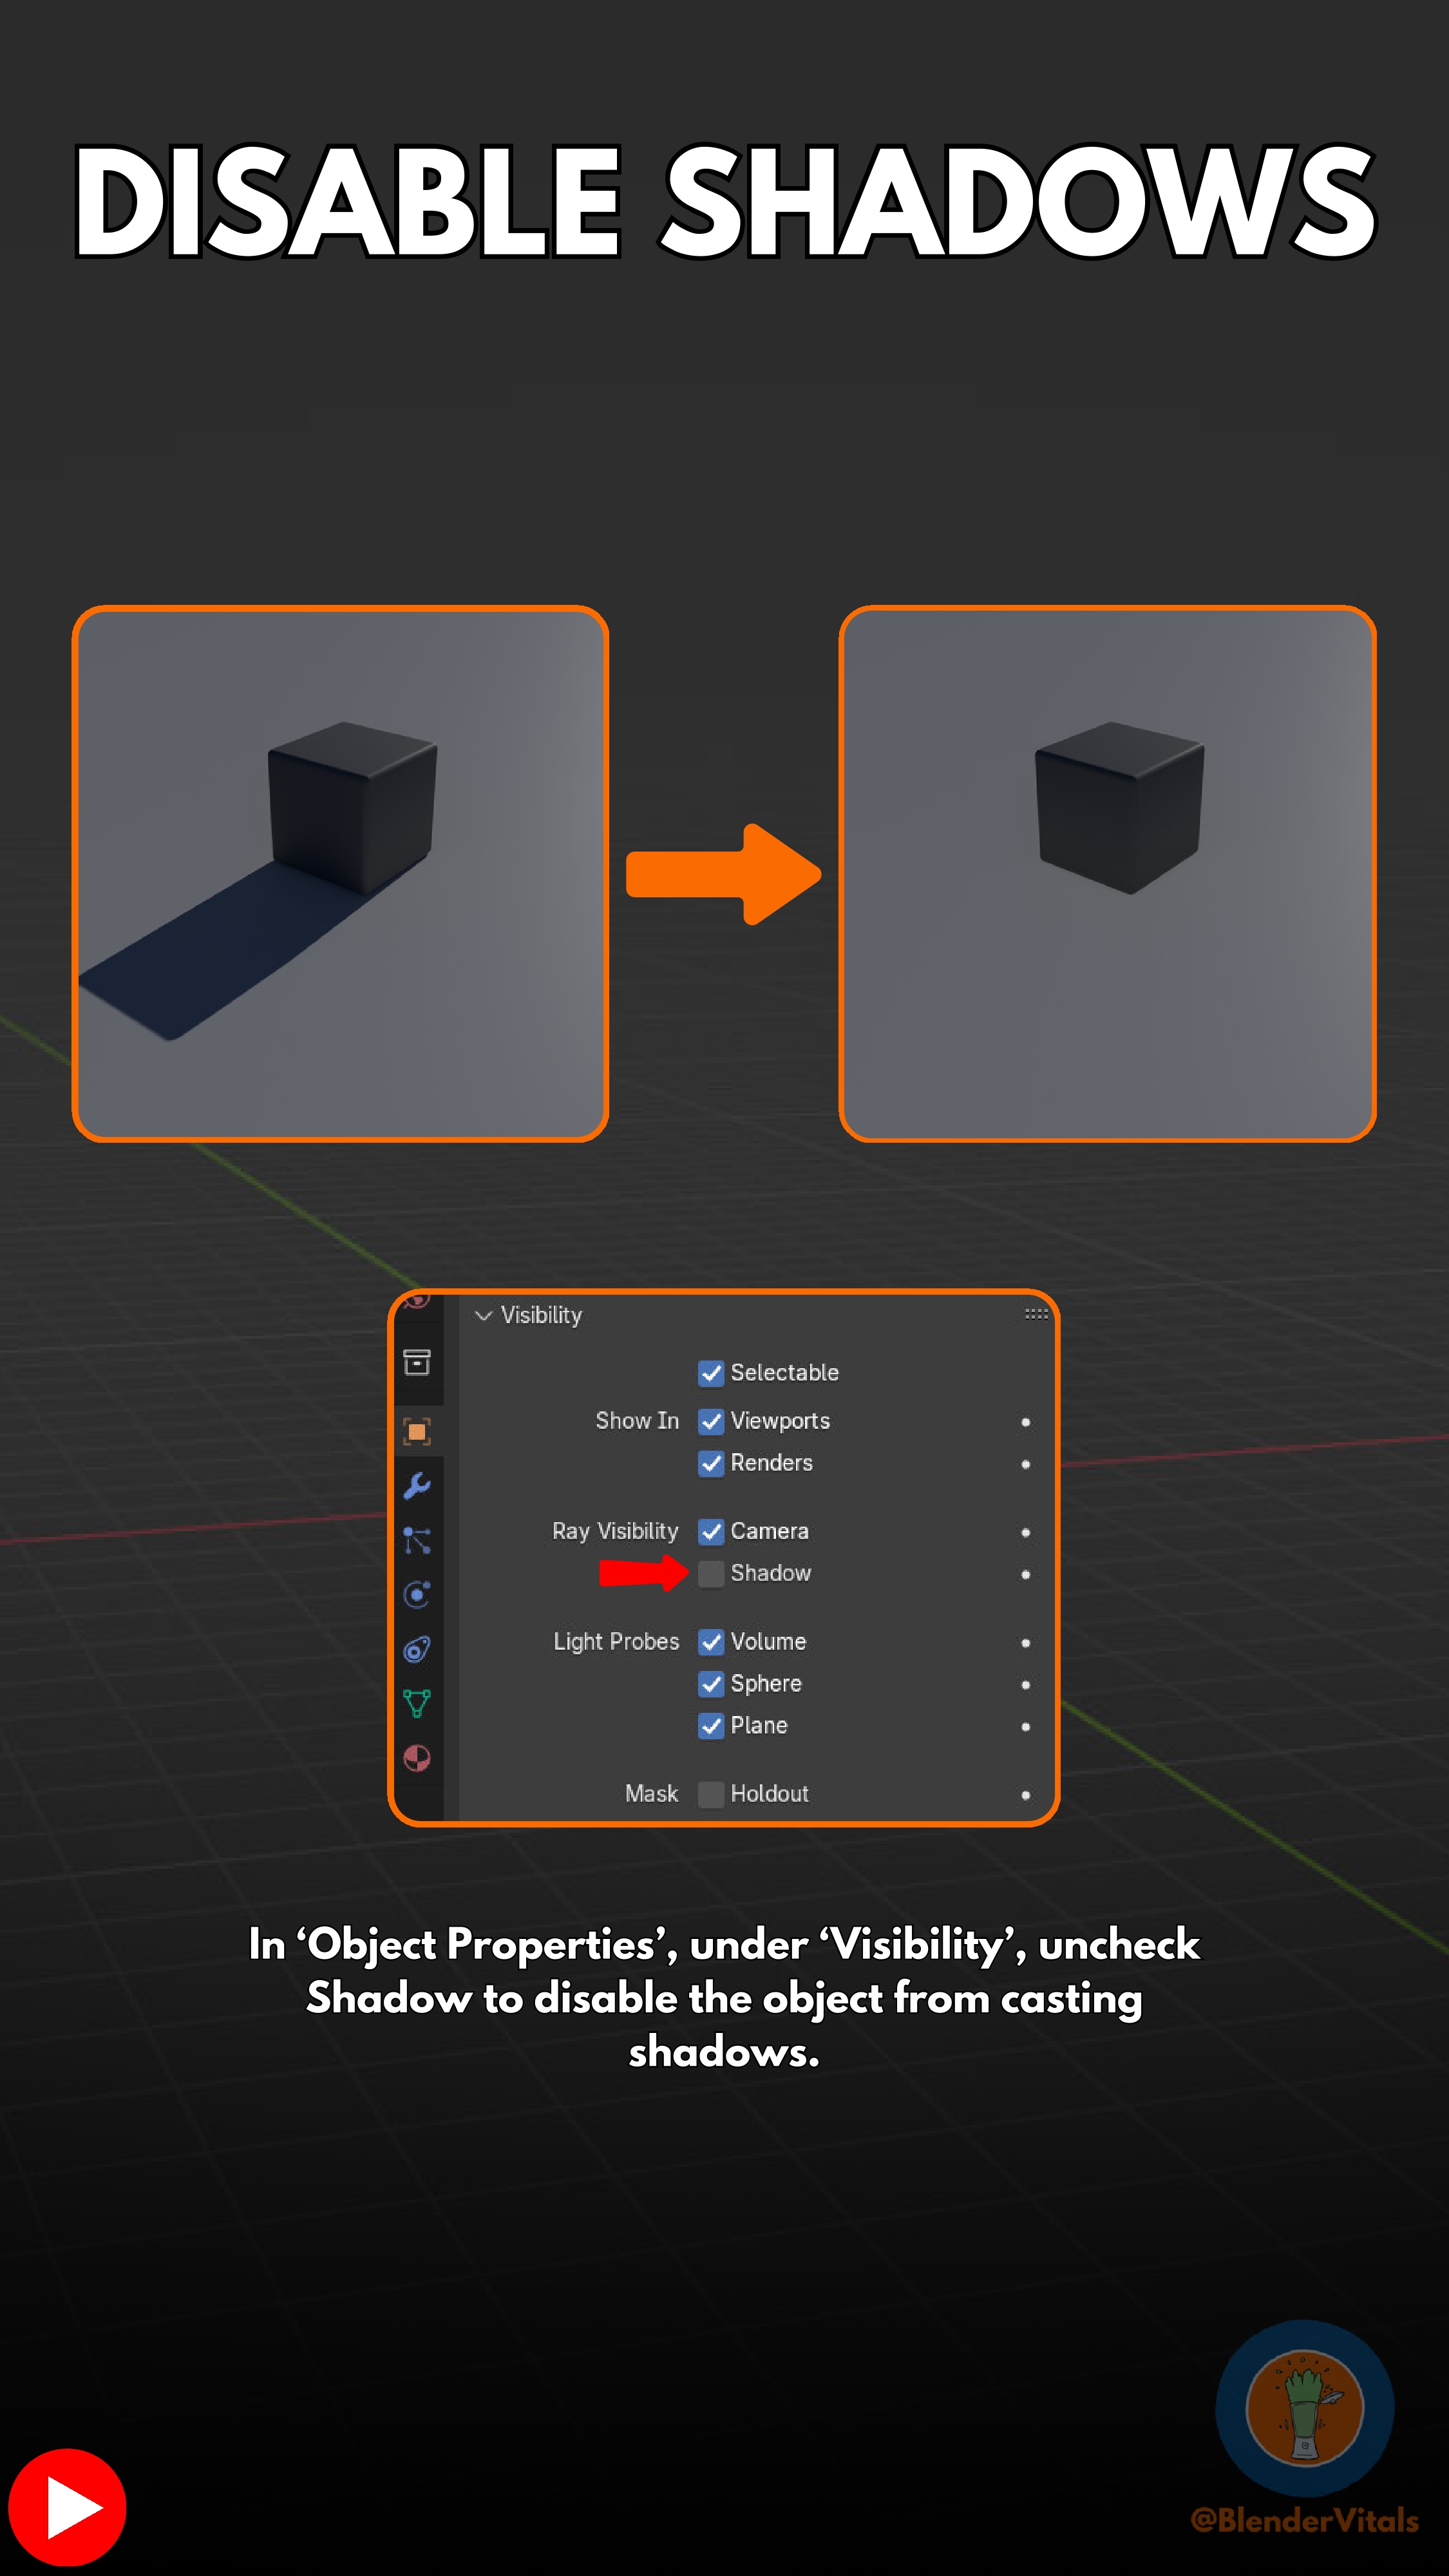
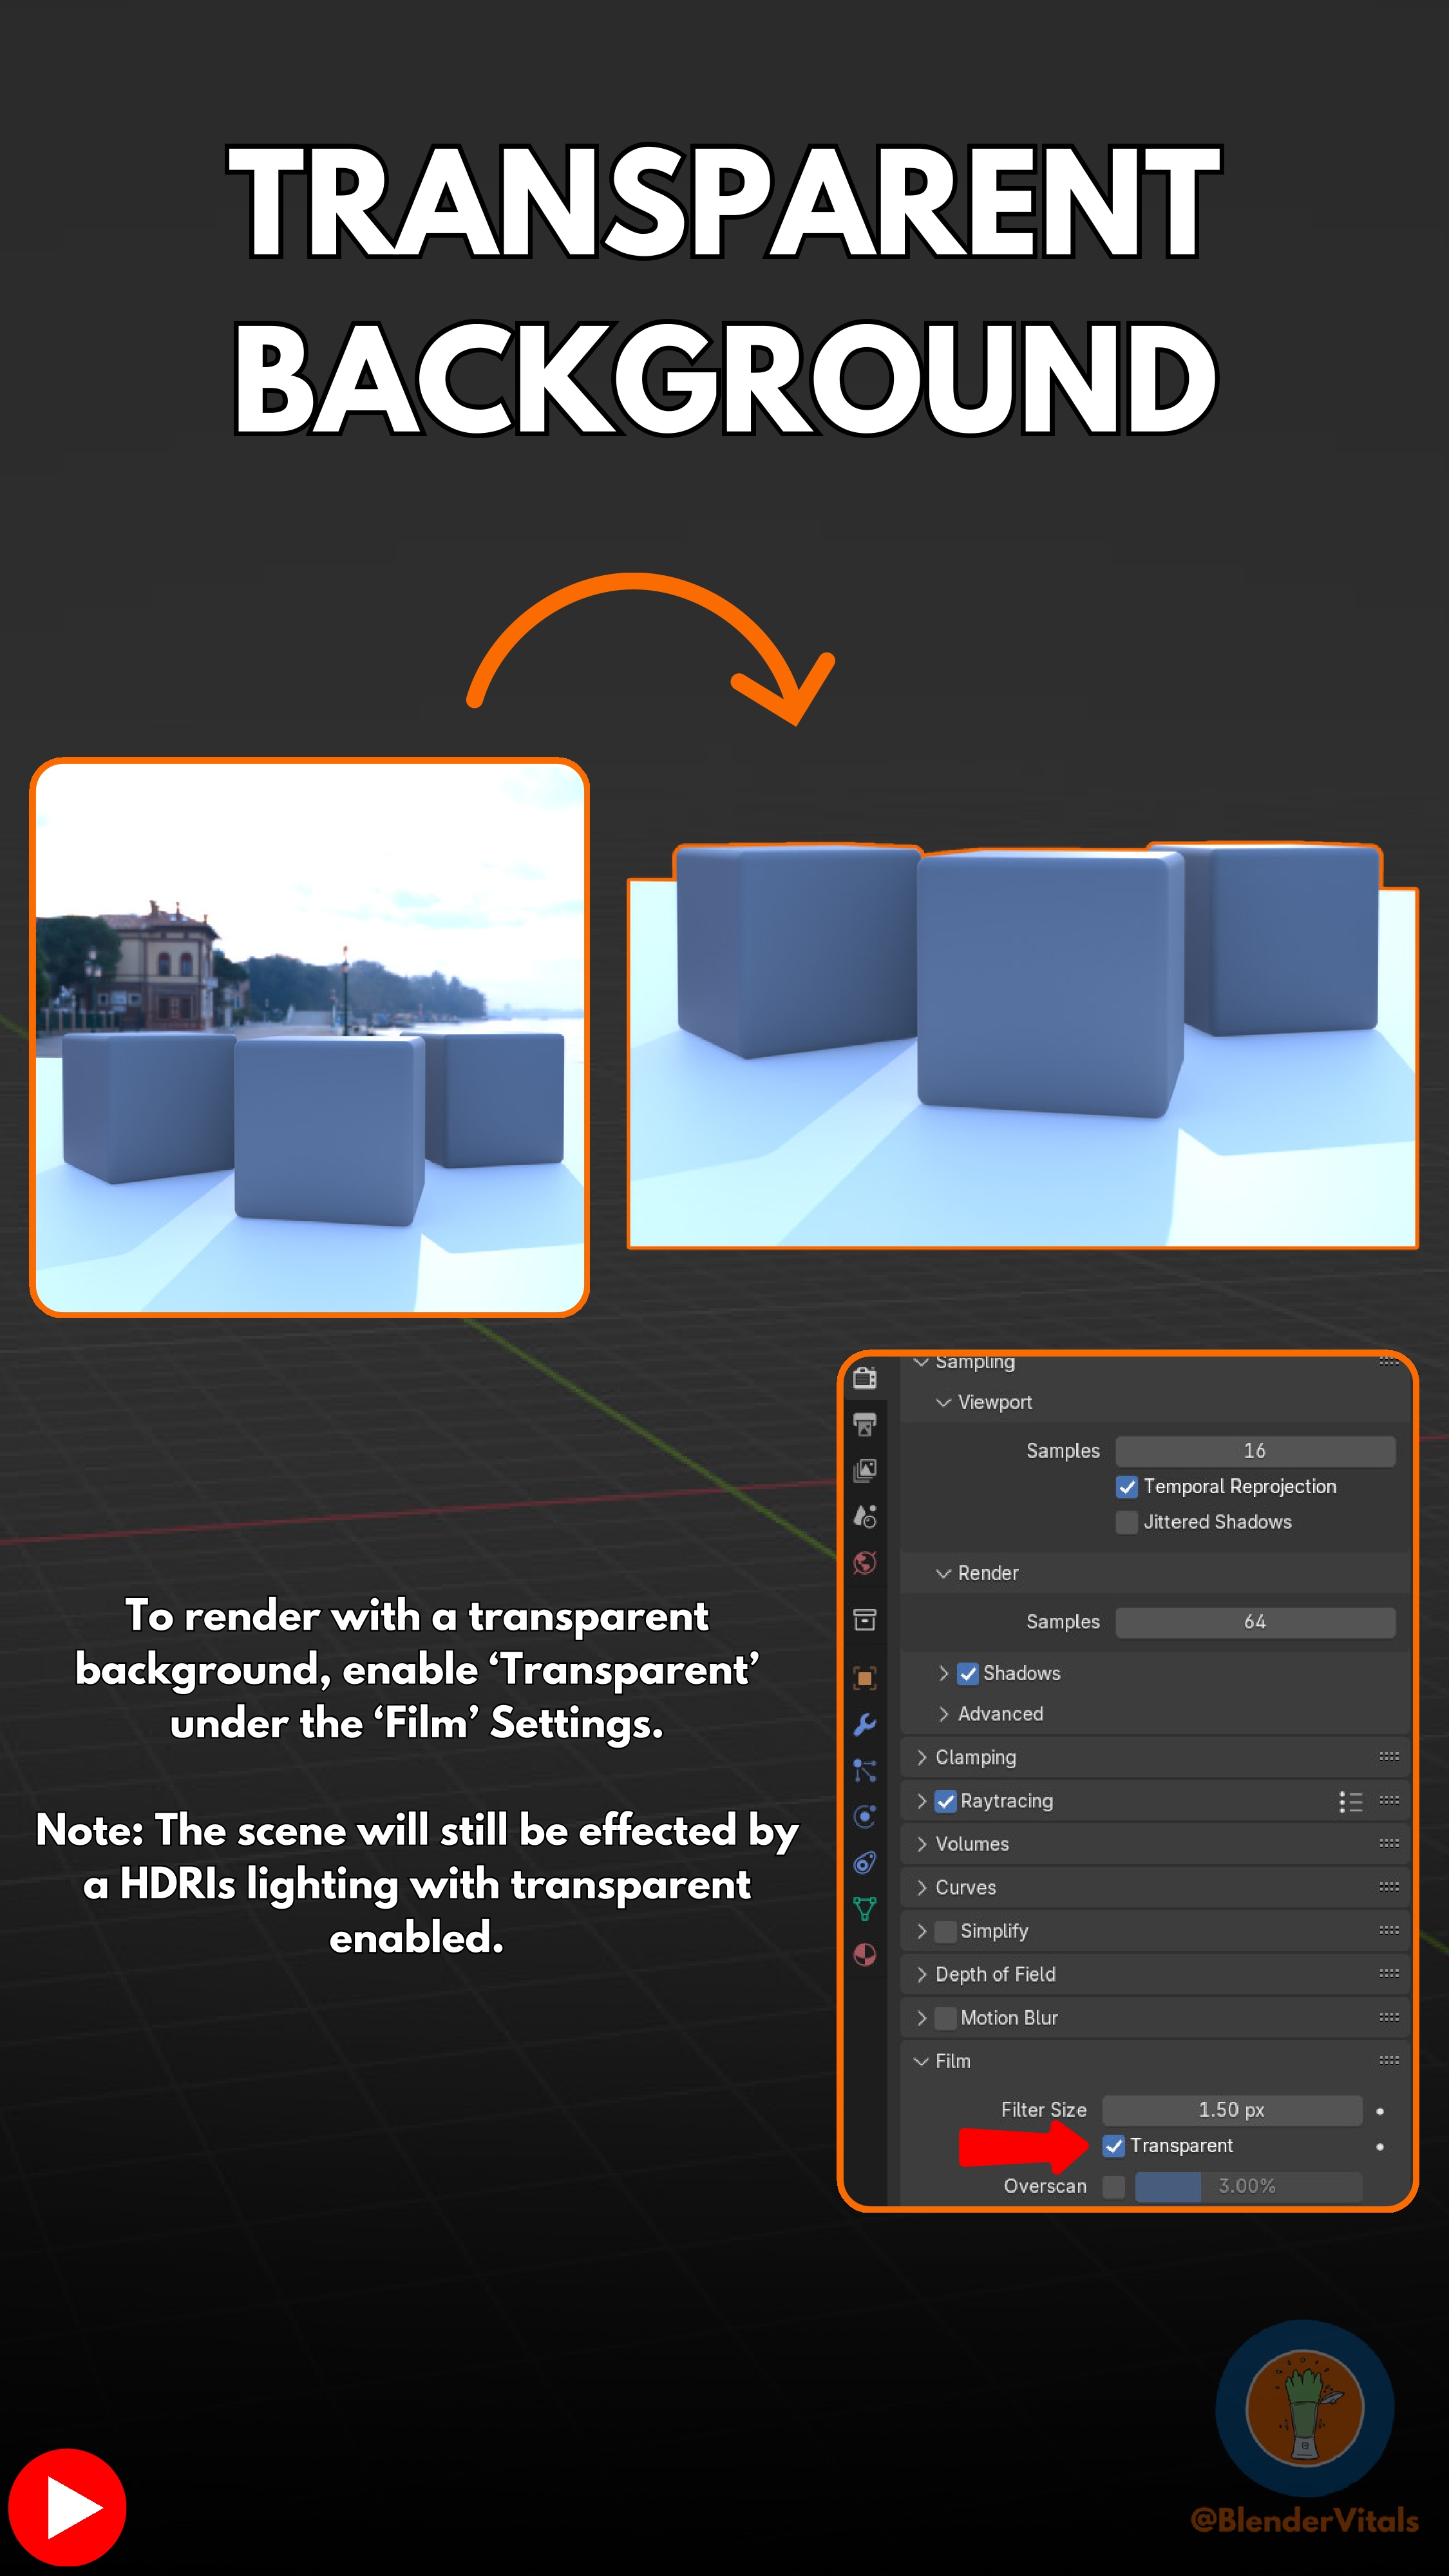
38 - RENDER SECTION 41 - HDRI SETUP 67 - LOCK LIGHT TO CURSOR 68 - LOCK LIGHT TO OBJECT 70 - SCENE CONTRAST 105 - DISABLE SHADOWS 107 - TRANSPARENT BACKGROUND